The MICRODOT® – If you can draw a cube, you can draw ANYTHING

I have designed many drawing stencils over the years, they have been popular but made in very small batches. I need help to get stencils made in larger quantities than I can manage whilst doing ‘the day job’ too.

Please click here

I have now taken the best features from previous products along with what I have learnt to create ‘The MICRODOT®’. This is a small stencil, that is packed with features and FUN.

I am ready to go with manufacturing once backed and order numbers are confirmed.  With the help from kickstarter, I am sure my stencil will make its way round the world!

I have recently been doing more and more consultancy work and am very passionate about trying to get as many pupils and teachers in the country to draw correctly.  The MICRODOT® has been extensively tested, my aim is to get as many pupils in the world designing with the help of the MICRODOT®.

I strongly believe that if you can draw a cube, you can adapt that cube to produce most products on paper. The MicroDot® stencil is compact, it uses the ‘dot-to-dot’ principle taken from the DTDOT® and also has a selection of carefully placed ellipse tools so the pupil can actually see how to use them.

There is a stencil for isometric cut outs, a funky arrow for annotation that can even be flipped to highlight environmental consideration. There is a 30 degree wedge for general isometric project, a small ruler and the fun, and much liked feature is that of the ‘sun and sunglasses’ stencil.

This feature helps pupils consider a direction of light source before they start to draw so rendering/shading can be done correctly.

If you back me, you will be helping more people learn to draw and design like a Pro.

Thank you

Please click here

John

Advertisement

www.dtresources.co.uk

As many of you will know I manage the Facebook Group ‘Design and Technology Teachers’ and the ‘DTResources Dropbox’.  I spend hours per week managing both of these resources and look at 100s of examples of classroom resources that teachers either sell or share via social media.

I feel that I have a good idea of what useful resources teachers would like if they had the time to make them and I am aware of some of the current issues that some departments face e.g. not having a full time technician or non-specialists teaching Design and Technology.

Since having a baby seven months ago, I find myself going to bed very early, and then getting up VERY early the day after.  These early starts have provided me with many hours of time to spend producing resources that I will use with my own classes, and will then give away or sell on the dtresources website.

I have always liked the idea of giving resources away, and will continue to do so if the resources can be downloaded as a PDF or JPEG for example.  The resources that will be sold have to have a price attached to them to cover the purchasing of materials, business running costs, website hosting and a small fee for my time in making, packaging and posting resources out to teachers….all of which is very time consuming.

It is my aim for the company to grow so that complete curriculum coverage can be planned for by using the resources from my website.

The other resources that will be available from http://www.dtresources.co.uk will help improve whole class teaching on topics such as drawing/sketching and annotation of ideas.  The class stencils that I have made came about from pupils in my class using a popular 3D drawing tool, but then wanted a stencil to help with 2D designing and annotation.  So far these stencils have really helped improve the quality of the work from the pupils in my class.  Click here to see the stencils.

Because I teach mostly AQA GCSE Product Design, the resources will be suited to delivering Product Design, Resistant Materials and KS3 Design and Technology. On the GCSE Product Design Exam paper, there is always a high mark question about manufacturing in quantity.  I have produced a class pack for teaching batch production/production lines and use clocks or photo frames as the product.  The outcomes have been outstanding.  Click here to see the products.

The next phase of the company will be to provide whole class kits to cover every part of the curriculum in an exciting and engaging way.

Getting started with 3D Printing in the classroom.

‘Keep the old, but in with the new’ – that is pretty much what it is like being a Design & Technology Teacher, and it is pretty much how I like it 🙂

Background

I am 35 years old, I am in my 14th year as a DT Teacher and my 11th year as Head of Department.  Whilst planning how to start this blog post I had a think back to what I loved about DT when I first walked into a workshop as a Year 7 pupil in 1991.  Mostly it was the smell of timber and coolant from either the lathe or milling machine, the selection of tools neatly in the racks, just waiting to shape my piece of raw material into something, that at the time I thought was magical…most probably a pencil holder.

I think I have had a selection of some truly amazing teachers that inspired me to become a DT Teacher myself.  I always though that if I enjoyed coming to DT lessons as much as I did, then what a truly amazing job being a DT Teacher would be!  I feel that during my secondary school and college years I was taught DT in a very traditional way.  I think I gained a solid understanding about shaping/joining timber, plastics and metals using most methods known.

I then went to Sheffield Hallam University to continue building on my current knowledge, but developed new skills using PIC technology/electronics and CADCAM.  At the time ProDesktop was just making its way into schools and 3D printers had not even been thought of.

I would say that I have had to learn as many new skills since starting as a teacher as I knew to begin within 2001.  Whilst some skills I have been taught over the years are not used much at my school, such as welding/aluminium sand casting, I still think it is important to know these skills as it is more the lacking of facilities/curriculum time that prevent me teaching this to pupils rather than a desire to keep the knowledge from them.

Sheets + Planks (can) = Boxes

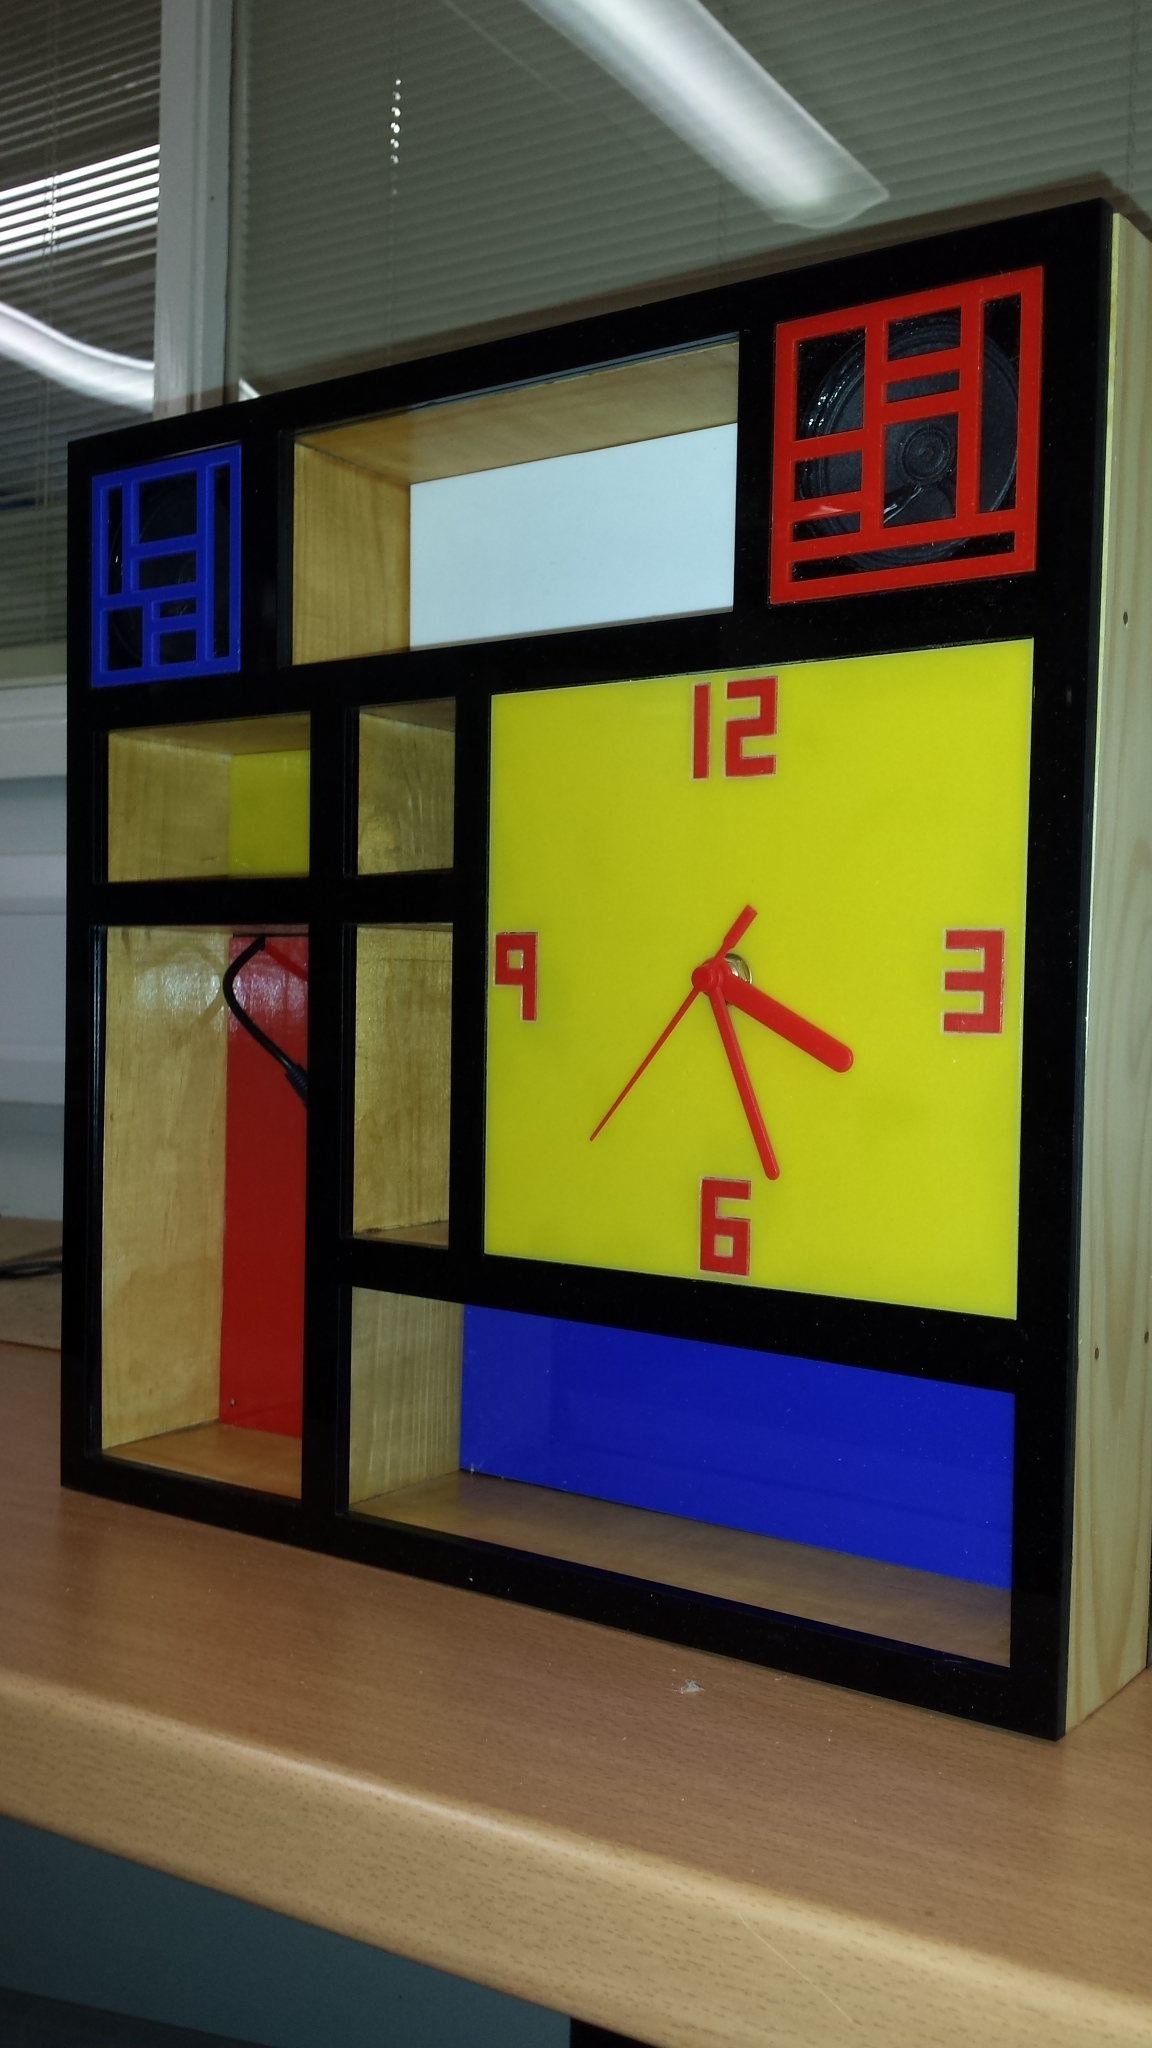
I can only speak of and criticise my own practice, but since most of the material that we buy in my department comes in sheets and planks, it is no wonder that lots of the pupils end up making something that resembles a box.  Don’t get my wrong, they have been mighty fine boxes…they have been Memphis Clocks, Art Deco MP3 docking stations, De Stijl lamps and desk tidies, whilst I’ve been very proud of them, they have been boxes at heart.  If ever a pupil wanted to make something that looked more organic (heaven forbid), we have done so,  but we have wasted quite a lot of material by layering up, sanding away and discarding sometimes as much material as we end up with!

I am sure that because I encourage my pupils to sketch in an isometric style using the method of crating as a starting point….they already have a box drawn on the page…they then have the design problem of sketching something for their MP3 player PCB/Battery to go in….why re-invent the wheel, when you have just drawn a perfectly good box?  As far as I am concerned, I need to change my mind-set and teaching strategy to overcome the production of boxes and plan how to teach the pupils to consider 3D printing as the method of manufacture!

A New Mind-set GCSE 3D Printing

Since this blog post is about getting started with 3D Printing, you should be able to see part of an MP3 Prototype that a pupil I teach has made.  They started off by designing with blue foam rather than sketching.  The pupil who made this model drew round his battery, PCB and speaker on the blue foam, then set to work shaping it with a coping saw and sander.  The shape he has ended up with is far removed from a traditional box.  In the past when pupils have made an MP3 docking station they have made an attractive pine box, used dowel to join the corners, turned aluminium feet to hold it off the table top, they have laser cut some acrylic sheet to cover the front, and cut out a decorative pattern from the acrylic so that when the speaker has been glued behind, you can hear the sound from the box.

GCSE Product Design

The photo of this GCSE project scored a moderated 32 marks for the practical aspect of the course.  It is made up from boxes within a box :-).  Its function is an MP3 Player, Clock and Storage unit. It measures 600x600mm and is 80mm deep, huge for the function really, but well made and finished, very typical of the project type that many of my pupils have made.

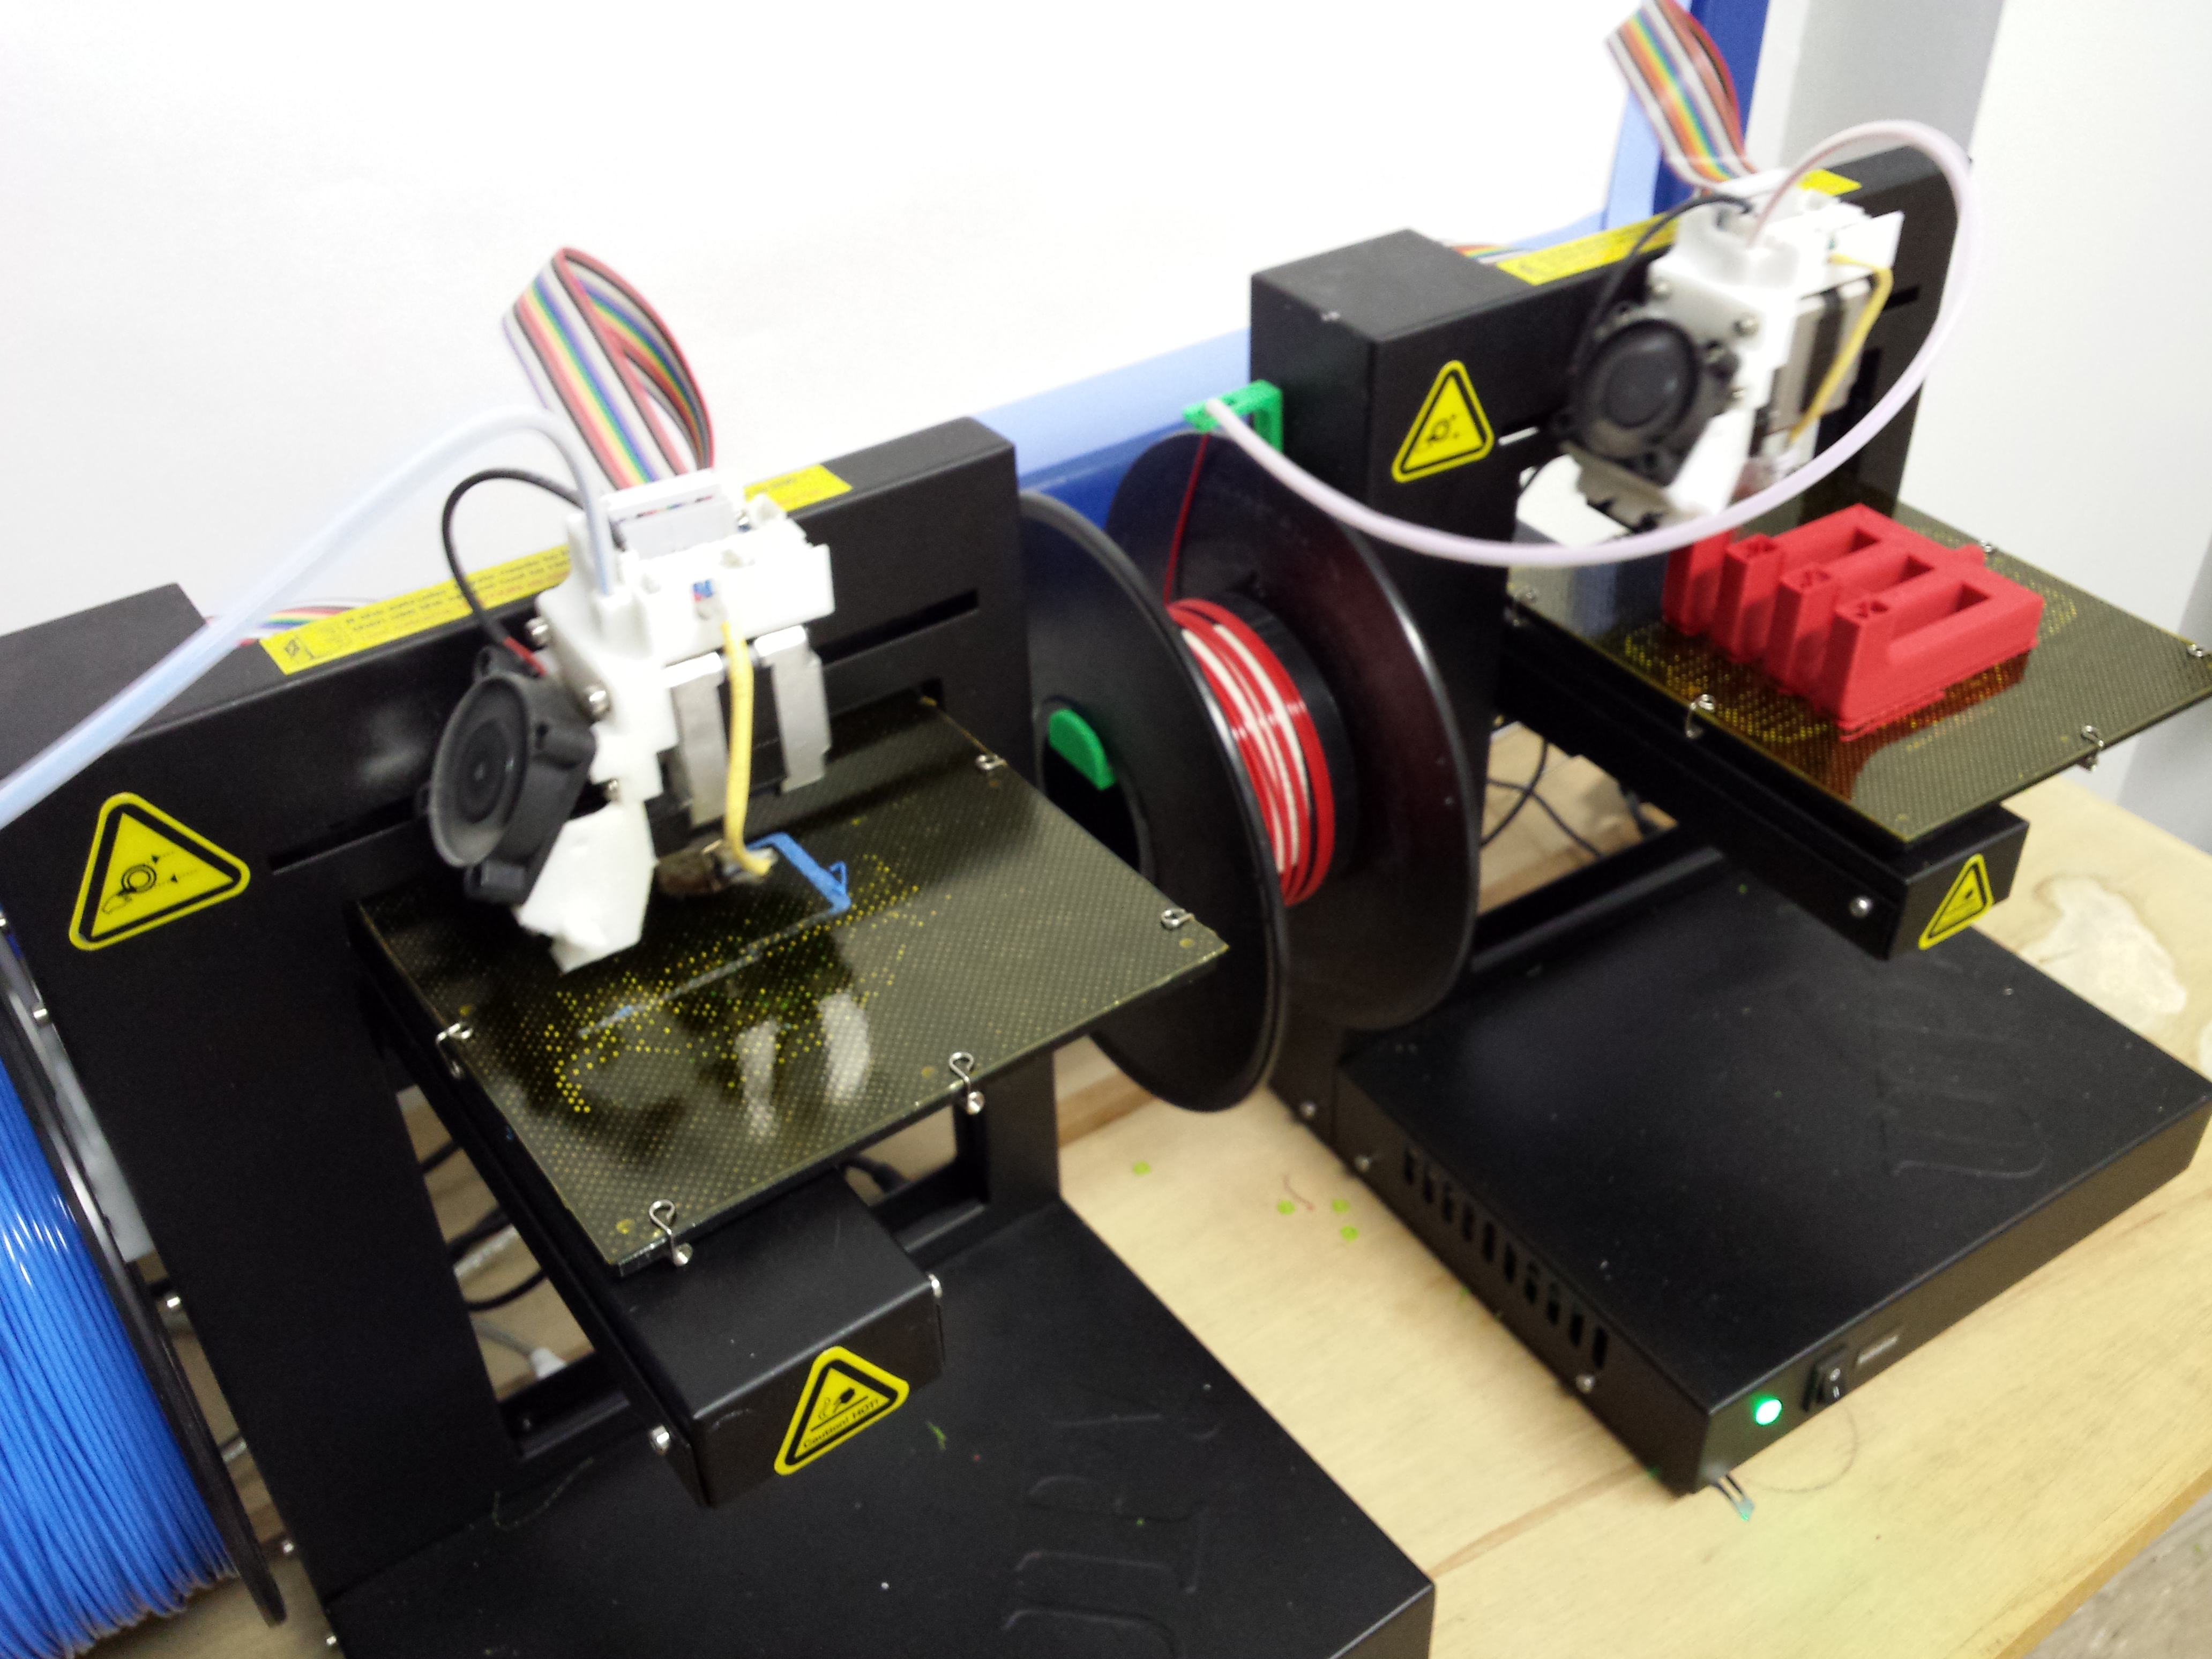
This year though, we have 3D printers!  The projects the pupils are making are looking far more professional and more like the size of the mass produced type found on sale.  At my school we use Autodesk Inventor as our main 3D CAD software.  The pupils all know that if they can draw it, they can make it, so I guess that in getting started with 3D Printing, you need to have got started with 3D CAD first. (You can download lots of free STL files to print, but the pupils will learn far more if they draw, and print their own work.)

How to Design for 3D Printing

There is nothing wrong with sketching and then drawing from a sketch to a CAD package.  From past experience though, if I have ever sat with a pupil and helped them draw something on Autodesk, that has started off as a sketch, I have always found that even the most able of pupils have missed off some dimension that leaves you guessing how big part of a drawing is going to be.  To fix this, I get all pupils to start with a 3D sketch, then make a full sized 3D blue foam/card model of the final sketch.  Once the pupil is happy with the final model I get them to sit at a PC with Autodesk loaded up, a ruler and some digital callipers.

I either get them to start with a profile drawing that can be extruded (depending on what they have designed), or they will start by drawing a block that was the same size as the original piece of blue foam.  It is then just a matter of careful measuring to remove the parts of ‘foam’ that you no longer need.  As long as a pupil can draw using a revolve and do simple extrusions to add/cut material they can pretty much draw most things they want to make.

What to print

When we got our first 3D Printer, it was an Up 2 Plus.  The first thing I did was download an STL file from a sharing site for a pencil pot.  Twelve hours later the print was done!  Since then I have learnt more about the software settings and could print the pencil pot in about 4 hours :-).  The main concern I had was how to get the pupils excited about designing for 3D printing, if I knew that I could never do 4 hour prints for each of them….then I had a brain wave!  I thought let’s get them to make a key ring!  I assume that most DT teacher have either made an acrylic Key ring themselves, or have taught pupils to cut/shape/polish acrylic key rings in their own workshop at some point?  After I had designed my key ring and printed it in just 8 minutes I thought that I was onto a winner!Up Plus 2

After a practice at making some key rings for most people I knew, I had time to reflect on what a poor idea this actually was.  In a way, I was still stuck in my old mind set of 3D printing something that I would normally be made from acrylic sheet (not that I make key rings anymore).

Whilst I think that 3D printing is amazing, I think that the real learning takes place with the designing, either on paper or screen.  The pupil actually learns very little seeing their design being made.  It is the thrill of getting your design printed that is the reward for designing something brilliant!

Now I encourage pupils to design with plasticine and blue foam, to look at images from nature and biomimicry design in a hope they will produce something a little more Zaha Hadid than Rubik’s Cube.

I am sure that my current Year 10 Product Design class will make their fair share of pine boxes for their desk tidy/MP3 player/lamps, but I hope to encourage them to ‘think outside the box’ (haha), and design maybe an exciting phone holder/headphone wrap or draw handle that could not be made in any other way other than to 3D print it!


The less teachers talk, the more pupils learn @jackiebeere @teachertoolkit

A couple of years ago @jackiebeere came to do a presentation at my school, this was soon after her book ‘the perfect Ofsted lesson’ came out.  I’m not on commission….but since it is a great read you can get it from the link here:

http://www.amazon.co.uk/Perfect-Ofsted-Lesson-Independent-Thinking/dp/1845904605/ref=sr_1_1?s=books&ie=UTF8&qid=1292606624&sr=1-1

One piece of advice that she gave was to try to aim for a teacher input of 20% and a pupil engagement of 80%. Many of you will have heard of the 80/20 split in many different situations,  “It was named after the Italian economist Vilfredo Pareto, who observed that 80% of income in Italy was received by 20% of the Italian population.

It was after Jackie’s presentation that I started to look at the clock in my room, so many times I have been guilty of standing there…..leaning on my whiteboard….and talking for up to 20 minutes – before I would unleash the pupils to actively learn.  I am even more ashamed that I am a Design and Technology, a teacher of a practical subject, where all the pupils say to me is ‘can we just get on with it Sir?’  Once a pupil even turned his stool round to face me, stretched his legs and leaned back to rest on his table, when I asked him why he was sat like that, he replied ‘I’m just getting comfy Sir before you start!’  Whilst this pupil was being polite (I think), it did make me realise that things have got to change and I need to reconsider my approach to the way I deliver my lessons.

I am going to list a few practical ways that I have adopted to ensure that the pupils do more work than me in the lesson, not only do I think the pupils are learning more, but I feel that I have more time in my lessons to speak to the pupils on a one-to-one basis, more time to assess their work with them and to ask really focussed questions that are pitched to the correct level of their ability….ensuring that each pupil is challenged.

  1. I use Solo Taxonomy in many of my lessons, I split the levels on learning/understanding into the five  Solo structures.  I write the different levels of learning/understanding on five post-it notes and stick each note in an envelope.  I have lots of envelops with the pictures of the Solo Structures on the front. (Go on twitter and search #Soloarmy for examples).  I then hand the envelopes out to various pupils as they come into my room, the lesson then starts with them opening the envelopes and reading out the differentiated learning objectives.  I use this envelop technique a lot, the pupils love opening them.  Sometimes they will contain instructions to share with their tables, instructions on how to peer assess, how to pack up work, sometimes I put instructions in so that the pupils lead a practical demonstration….rather than me. The envelopes could contain anything that you would normally stop a class for.  Do try it and comment on here what you have done with the envelopes!
  2. An amazing idea from @teachertoolkit – Homework.  Homework is often an issue.  Either because it is time consuming to think of what to set or time consuming explaining how to do it.  I think that if you add up the time a teacher spends setting homework and explaining it, over a day, a week, a month, a year….it would be a shocking amount of time that not only a class is stopped for, but how long they have stopped learning for.  @teachertoolkit came up with the idea of take-away homework.  I now have a take-away style homework menu up in my room with 50 different homeworks on.  I spent about 30 minutes making the poster (it can be found on my blog).  The pupils now just get given a time slot in the lesson where they go to the take-away and pick which one they want to use….they love it.  Now my whole class carry on working whilst each table simply goes over to the large A1 poster and picks a homework.  I usually write on my board, Table 1, 9.00 am, Table 2, 9.10 am etc. etc.
  3. On a laser cutter I made a class set of Red and Green discs, they look like poker chips from a casino, but are red on one side and green on the other.  The pupils simply have these in front of them and flip them back and forth during the lesson to show their understanding.  I always say that the discs are for them, rather than me.  If a pupil turns their disc to red, a pupil with a green chip must try and help them.  Again this is something that all pupils seem to like from Year 7 to 11.
  4. Exit cards are in a small box in the middle of the table (this is where I also keep the red/green chips), the pupils answer some simple questions on the cards and hand them to me as they leave.  I change the questions every few weeks to keep them interested.  Typical questions could be, ‘what have you learnt today?’ ‘have you enjoyed the lesson?’ ‘on a scale of 1 -10, were you challenged enough?’ ‘what do you think we will learn next lesson?’ I then use the feedback to inform the way I deliver my lesson next time.
  5. I have a Solo Taxonomy Continuum line on the wall in my classroom.  After the learning objectives have been read out, (by the pupils), I get the class to write their name on a post-it and stick it on the line.  During the lesson, without me saying so, they can go and move their post-it as they feel they make progress.  It is great to take a quick picture of the post-its on my phone at the start of the lesson, and then at the end.  I email the pictures from my phone to my work email and stick them on the interactive whiteboard for the class to see….whilst they fill out their exit tickets.  A great way to keep the class motivated by sharing the progress with them.

All these resources take a bit of time to make and set up, but once you get the pupils in a routine the lessons pretty much run themselves!  My last 6 lessons have been graded as outstanding, both by Ofsted and in school.  I truly believe that to be outstanding you need routines that the pupils know.  It would be a shambles if you had no routines that promoted learning through a teacher talking less, and then shocked the pupils by copying all the things I’ve written about here simply because you know you are being observed.  Forget observations, plan outstanding lessons for the pupils, get your routines right and let the pupils lead the learning.


Please comment on this blog if you have any other good tips for me to try, or if you use any of my ideas.


Thank you.


50 Strategies for Differentiation

How can we put policy into practice?

50 Strategies for Differentiation
from the amazing teachers at Greenford High School

shared at Teaching and Learning Takeover
at Southampton University 19th November 2013

Get the basics right: CONSISTENCY
1. Exercise Books – organisation
2. Exercise Books – meaningful marking, with DIRT – Dedicated Improvement and Response Time
3. Seating plans with info relevant to students’ needs
4. Get to know your students as well as possible
5. Show them you care, ask about their lives, remember their replies
6. Use the behaviour management systems of the school

Obvious, but often ignored
7. Grouping
8. Re-arranging tables in a room
9. Teacher position in classroom
10. Schemes of work with challenge at different levels
11. Homework booklets adapted for a range of abilities
12. Clear coherent planning to teach what is really important, not a moment wasted
13. Listen to your students during the lesson and change your plans accordingly

View original post 900 more words

Teacher Interview Questions and tips

Donnelly’s Interview hints and tips

I thought I would write down some hints and tips about going for job interviews at schools after someone on my Facebook group ‘Design and Technology teachers’ asked for advice about a job they were going for – sure it will be useful to students that I have at my school as well.

If you read this blog, and find it useful….and get the job, please comment for others to see.

  • Research the school thoroughly. Check their inspection(s) and from this, figure out what their strengths are, and what you can add to the school to build on this.
  • Keep bright and enthusiastic – it is stressful and gruelling, and you may think you have ruined your chances throughout the day, but if you keep focused and remember what you do, every day, as a great teacher – then you will be fine.
  • Do not be put off by the really chatty outgoing one who is also there to be interviewed, I know I have seen many candidates try to pretty much say all they know about education during the day and then are in a bit of a mess at the interview.  Please also read my blog post about Assistant Head Teacher interviews, I have included a few of the tasks that are generally used in schools.
  • Do not feel the need to ask questions in a tour or group interview – this was one thing I really panicked about before the interview – I felt I knew the school really well, well enough not to ask any questions, while the other candidates did – and when it came to my turn (all the staff looked expectedly at me when the other candidates had finished) all I said was;

“I feel that, at this moment in time, I do not have any questions” and when it came to my interview with the Headteacher, I made sure I demonstrated my knowledge of the school by building it into my answers.

Finally, I always made sure that my answers followed a specific pattern. I was once advised by a wise Deputy Head to respond to extended answer questions with ‘there are 3 points that I would like to make’…..then start to answer the question.

This technique stops you rambling, encourages you to answer fully and makes sure you cover all parts of the question.  If you feel that you need to add another point, just end with, ‘and one final point I would like to add is……………’

Do not answer every question like this, but some do require an extended answer and this is just one way to do it:

Most NQTs or new teachers will be asked something about Behaviour Management, or “what makes you a good teacher” I would answer in the following way, giving a comment about each heading;

Me  – The pupils – The school

So for example:   “What makes you a good teacher?”

Me– planning, preparation, assessment, delivery (etc. there is loads more but it’s all about you!)

The pupils– mixture of formative and summative assessment, clear expectations, positive atmosphere and feedback, etc.

The school– professional development (if you participated or delivered some yourself) sharing resources, observing others, self-evaluation of teaching, not afraid to ask experienced teachers advice, working with other departments, etc.

I find this technique really helped me when answering questions, as I visualised where I wanted to go with my answers, and always had examples from my classroom.

Typical Questions

Why did you apply for this particular role?

What are your core strengths/weaknesses?

What can you bring to the role that other candidates may not bring?

What makes a successful school?

How would you work with a teaching assistant in your classroom?

Do you find it difficult working alongside older, more experienced staff?
How would you react if a senior member of staff queried or criticised some aspect of your teaching?

What is your understanding of high-quality teaching and learning?
Describe a good lesson
Describe a lesson that did not go well. What were the reasons for this?
If I came into your classroom, what would I see?
Describe the teaching method you find most effective
Do you differentiate between outcome or task?
Tell me a bit about the lesson you taught this morning, were you happy with it?

When marking a piece of work that has been done by a pupil, how do you ensure your comments encourage the pupil to make progress?
How do you ensure all children are involved?
How would you motivate a reluctant child?
How would you meet the needs of gifted and talented children in the class?
Have you had experience of a very high attaining and very low attaining child in your class?
Tell us about your experience of assessment for learning and assessment of learning
If a child doesn’t show signs of improvement after all your planning, monitoring, assessing etc, what do you do next?
What strategies do you use to manage children with special educational needs?

What behaviour management policies have you experienced, and what do you consider as having been effective?
How would you deal with a pupil who is not co-operating?
How would you deal with a disruptive child?
What do you think is the best way to motivate pupils?
Some people say you should demand respect from children. Do you agree or disagree, and why?
What do you understand by the term ‘providing support’ for the pupil?
Bullying is often a serious issue that has to be dealt with in all areas of work with children. In your experience, what is the best way to deal with it?

Ensure that you know about the ‘Big Picture’ – there are lots going on in education at the moment, be clear of any changes that effect your subject, what do you think of the new National Curriculum?  Do you see these changes as an opportunity?  How do you use technology in your lessons?  What do you think of pupils bringing their own technology into your classroom? etc etc etc.


Good luck with your interview and share any tips via the comments on this blog.