The MICRODOT® – If you can draw a cube, you can draw ANYTHING

I have designed many drawing stencils over the years, they have been popular but made in very small batches. I need help to get stencils made in larger quantities than I can manage whilst doing ‘the day job’ too.

Please click here

I have now taken the best features from previous products along with what I have learnt to create ‘The MICRODOT®’. This is a small stencil, that is packed with features and FUN.

I am ready to go with manufacturing once backed and order numbers are confirmed.  With the help from kickstarter, I am sure my stencil will make its way round the world!

I have recently been doing more and more consultancy work and am very passionate about trying to get as many pupils and teachers in the country to draw correctly.  The MICRODOT® has been extensively tested, my aim is to get as many pupils in the world designing with the help of the MICRODOT®.

I strongly believe that if you can draw a cube, you can adapt that cube to produce most products on paper. The MicroDot® stencil is compact, it uses the ‘dot-to-dot’ principle taken from the DTDOT® and also has a selection of carefully placed ellipse tools so the pupil can actually see how to use them.

There is a stencil for isometric cut outs, a funky arrow for annotation that can even be flipped to highlight environmental consideration. There is a 30 degree wedge for general isometric project, a small ruler and the fun, and much liked feature is that of the ‘sun and sunglasses’ stencil.

This feature helps pupils consider a direction of light source before they start to draw so rendering/shading can be done correctly.

If you back me, you will be helping more people learn to draw and design like a Pro.

Thank you

Please click here

John

Advertisement

Progress 8 and Attainment 8

I have had a few people ask what is Progress 8, Attainment 8 and how do ‘they’ work it out….Well, in my simple kind of way, I’ll try and explain.

Long gone are the days of saying ‘my class got 95% A*-C’ and necessary being totally pleased with that. (Even thought it sounds great!)  The measures now highlight what the pupils attained compared to prior attainment at primary schools.

A Progress 8 score is worked out by comparing the end of GCSE achievement, (this is their Attainment 8 score), with the average Attainment 8 score of all pupils in the nation who had prior attainment of a similar starting point at the end of primary school.

Because the Attainment 8 score that a pupil gets is compared to that of others in the nation, it can’t actually be calculated until the pupil actually has their GCSE results.

In the summer when your school has an actual Progress 8 number, you will know instantly if the Head Teacher and Powers that be will be happy.


A score of zero means pupils in this school on average do about as well at key stage 4 as other pupils across England who got similar results at the end of key stage 2.

A score above zero means pupils made more progress, on average, than pupils across England who got similar results at the end of key stage 2.

A score below zero means pupils made less progress, on average, than pupils across England who got similar results at the end of key stage 2.

This sounds simple when it’s written as three bullet points, but if your school number is below zero, the might still have made progress….just not as much progress when you compare how other pupils achieved when the same Key Stage 2 starting point.

Schools in which pupils make on average one grade more progress than the national average (a Progress 8 score of +1.0 or above) will be exempt from routine inspections by Ofsted in the calendar year following the publication of the final performance tables.

For there to be an Attainment 8 score, there must be 8 attainment numbers in the 8 buckets, buckets is a term used for a subject that produces attainment that can be counted towards a pupils Attainment 8 score.

The first two buckets are filled with numbers from Maths and an English attainment number, the highest from Eng Lang/Lit is used.

The next three buckets are filled with EBacc subjects.

The last three buckets are filled with other subjects that are often in option pools on a pupils timetable.

If for example English Literature has been used in the first bucket because it is a higher attainment number than the pupil’s English Language score, the English Language score can still go in another bucket from the third bucket list if needs be.

Buckets one and two have a double weighting so that when all 8 attainment scores are in, the total number of them all added together can be divided by 10 to give an average….so it is essential that Maths and an English grade are good as these are doubled in the first two buckets.

Key Stage two attainment is used to produce a fine points score for a pupil, this number is used to predict what a pupils Attainment 8 score will be.

The Attainment 8 score is produced from adding the 10 GCSE results together (Eng and Maths double to give 10), this is then deducted from the estimated Attainment 8 number that the pupil should get based on KS2 data. This number is then divided by 10.  This is the pupil’s Progress 8 score….Simples.

E.g

If John got:

7 in Maths (14)

8 in  a English Language (16)

6 in Core Science

7 in Additional Science

7 in French

6 in English Literature

6 Design and Technology

5 in Art

The total would be 67.

If John’s KS2 data gave an average of 5.1

It is worked out that if a pupils has KS2 data of 5.1, then their Attainment 8 score would be 59.92. (This will change year on year as new data is used).

67-59.92 = 7.08

7.08 / 10 = 0.71

In this case John did really well and scored much higher than zero for his Progress 8 Score.

I hope this has made some sense….

Thank you for reading.

Data for this blog post was take from:

https://www.gov.uk/government/uploads/system/uploads/attachment_data/file/583857/Progress_8_school_performance_measure_Jan_17.pdf


I’m a Teacher, I’ve managed to get a 3D Printer (woohoo!)……What do I do with it now???

So, you’ve seen things that have been 3D printed on Twitter or The Design and Technology Teachers’ Facebook group https://www.facebook.com/groups/DTteachers/

You have CAD software and a 3D printer, I also guess you have been on http://www.thingiverse.com/ and have made an Eifel Tower….(if you haven’t then the link is here http://www.thingiverse.com/thing:32825)

Now you have the issue of what to actually print that will be of benefit to not only the pupils you teach, but the subject we all love….DESIGN and Technology!

I shouted DESIGN in capital letters, because, for me, 3D Printing is all about inspiring pupils to design.  There is nothing wrong with using Thingiverse to make a few prints to show pupils, it can also be a great way to get used to using your printer, but ultimately, 3D Printing what you have designed is what it’s all about for me and the pupils at my school.

I have had many printers over the last four years and have had up to five all running at once in my classroom…..I did just start with one though, and this blog post is really aimed at teachers that might have just one printer, or will use this blog to try and get one, they are life changing and are simply amazing, so good luck if you are putting a bid together! (email john@dtresources.co.uk if you want any help!)

I am in the very fortunate position of working at an ‘Outstanding Teaching School,’ and as well as my job as Head of Design and Technology, I also do SLE work (read previous blog about what an SLE is if you are unsure) and often support CAD training and the use of 3D printers in the classroom.

If the outcome is a 3D Print, it is the realisation of an idea or could be part of an iterative design cycle.  With this in mind, the learning that take place in your classroom has very little to do with 3D Printing.  The learning takes place in the way the print has been designed.  My point is proved when you consider that if a pupil downloaded a file to print, they may learn how to set up a printer, but if all they keep doing is printing the work of others….they are not learning any more about design.

There is no doubt that our subject offers outstanding learning opportunities that challenges the most academically able minds on the planet….but if we focus solely on project based learning where every pupil makes the same project, we are going to slowly damage the subject.

The subject has moved to designing within a context rather than to give a pupil a design brief….whilst this could be seen as a good thing as the open task is exciting, I still like to let pupils choose from a selection of pre-thought out design tasks so they can get their teeth stuck in straight away.  I have spent a while looking online at some good starting points that could be used in lessons to encourage pupils to design.

basically, you need:

  • CAD software (I used Autodesk Inventor up until about a month ago, but am now completely hooked on using Autodesk Fusion 360)
  • Paper and pencils for initial ideas (some people design straight on screen, but I think I’ll always be a sketcher first :-))
  • PCs for pupils to use.
  • At least one 3D Printer
  • Some filament to print with, there are lots you can buy now, but starting with a roll of PLA would be my advice.

You need to excite the pupils about getting their design printed, but need to make them aware that they are learning by designing and the 3D print will be the prize at the end of the unit of work.  I see the unit of work as a sort of competition, I tell the pupils that we can’t have the one 3D printer being used to print something that isn’t well thought through.  There is nothing wrong with printing something that isn’t quite right first time round though.  I often will print something on a fast setting with a low infill just to see how it may fit with another part.

If I had a class of 20 (ideal world I know!), I’d suggest you offer to print 5 from the class, if you can fit in printing more then great, but by keeping the number low, you make the 3D print a bit more exclusive and the stakes of the competition greater.

(Hundreds of pupils have had 3D Prints at my school now, but bare in mind this blog is about getting started and developing with your 3D printer over time).

Now you have the gear and the pupils, you need to get them a problem to solve so they can design (and learn).  Below is a list of useful things that I would suggest:

  • Passive Phone Amp
  • Phone Stand for a bed side table (hands up if you put your phone on the floor at night?)
  • Soap Dish
  • Jam Jar Handle (so many places are now using jars as glasses, why not make a handle for one?)
  • Small Floating Shelf for a wall with a secret compartment.
  • Head Phone Holder
  • Lamp Head for use with 5V LED strip light
  • Garlic Crusher
  • Ear Bud Wrap
  • Tablet or iPad stand for a long journey (extension to this is to make it so it folds)
  • Money Box
  • USB/SD Card Holder
  • Teachers’ whiteboard pen holder
  • Wall Mounted Camera Holder
  • Door Hooks
  • Door Stop
  • Book Mark
  • Wall Mounted Storage for a particular item

Pupils will need some items to measure so they know how big to make certain parts, I have sets of digital callipers so pupils get used to making products to a fine tolerance.

At first, CAD skills can be limited and great success can still be had.  I start by teaching the following skills:

  • Draw a 2D shape and Extrude it.
  • Draw a 2D shape to cut though a solid.
  • How to draw a new solid on a face or new work plane
  • How to draw using a revolve tool
  • Fillet and Chamfer

Once a pupil has learnt the skills above (2 lessons), they are able to start designing something that can be printed.

Once they have seen some work printed, both you and them will learn why some prints work out better than others.  The more you print, the better you will get!

Most of the items on my list have been designed and made at my school, pupils love 3D Printing but know only the designs that have been thought through the most will get printed (this is at KS3, 11-14 year olds).

GCSE pupils all design many parts for their projects and have all of them 3D Printed, the quality of the work produced and the practical marks gained are now always high….this is not just because of 3D Printing, but because the pupils have got better at designing!

Please comment on this blog if it has helped with your 3D Printing.

Thank you.


SLE School to School Support

In my last post I talked about the benefits I feel I have being part of a teaching school that deploys SLEs. (Please read my previous post if you are unsure what an SLE is).

I thought I would just highlight some of the areas I have assisted with so any readers could either considering becoming an SLE themselves or might feel you could do with a visit from an SLE from your local area.

SLE work should be planned over a pre-agreed length of time, some of my contracts have been for one day or three days.  If the contract is for a three day, it will more than likely be split into some half days so that the points of discussion can be followed up on.  The sort of projects I have help with are:

  • Full re-structure of Key Stage 3 so that the curriculum feeds into Key Stage 4.  This is really enjoyable work as I get to help design way Design and Technology is taught in schools other than my own.
  • Practical Workshop Days, I love doing these.  Very often I have been asked to go to a school to provide training on teaching D&T in a workshop, mostly I pick some projects that suit the facilities the department has, and then deliver the way I would teach pupils to make the same projects.  These days are great for teachers that have taught outside of the workshop for a number of years.
  • Autodesk Inventor 2016, a great free CAD package that can be easily used to link to 3D printing.
  • Autodesk Fusion 360, my favourite CAD package, truly amazing photo quality renders can be produced with Fusion.
  • 3D Printing in the classroom and how to manage one  printer with a large class.
  • How to draw and design using an iterative designing method.


If any of the above sounds like it could be useful to you, and you are close to Bolton (BL49RU), please email me donnellyj@st-james.Bolton.sch.uk and I can come to your school or arrange a meeting to work through any D&T/Leadership issues you have.


Becoming an SLE

I am a long standing Head of Department at St James’s C of E High School in Bolton.  This is my 13th Year in my current role, I also run a successful company called DTResources Ltd (www.dtresources.co.uk).  I am very fortunate that I not only work at an ‘outstanding school’, it is also a ‘Teaching School.’

”Teaching schools are strong schools led by strong leaders that work with others to provide high-quality training, development and support to new and experienced school staff”.  (https://www.gov.uk/guidance/teaching-schools-a-guide-for-potential-applicants)

As part of our teaching school status, we are also a school that organises the deployment of specialist teachers that can provide assistance to other schools, the teacher going to help is called an ‘SLE’.

”If you’re an experienced middle or senior leader who’s interested in supporting middle and senior leaders in other schools, you may wish to apply to become a specialist leader of education (SLE).

There are currently over 7,300 designated SLEs.

Teaching schools and system leaders support the Department for Education’s goal to provide educational excellence everywhere so that every child and young person can access high-quality provision, achieving to the best of their ability regardless of location, prior attainment and background.”  (https://www.gov.uk/guidance/specialist-leaders-of-education-a-guide-for-potential-applicants)

To become an SLE, you need to have worked with schools in a way that shows your help has had a sustainable impact after you have offered assistance.

I am fortunate enough to have been called to a number of schools to offer help in a great many ways.  I am currently working towards becoming an SLE at the next round of interviews in May, in the mean time I enjoy helping where I can, colleting impact evidence as I go.

I shall pot again this week to highlight some of the areas I offer assistance in…..who knows, I might be able to come and help at your school?


The iterative design process of ‘The DTDOT’

The iterative design process of ‘The DTDOT’

By John Donnelly @educationcpd

www.dtresources.co.uk

Donnelly, John.JPG

John Donnelly is Head of Design and Technology at St James’s C of E High School in Bolton, he manages the largest collaborative Facebook group, ‘Design and Technology Teachers’, he is the company director of DTResouces.co.uk and is the brains behind the company’s flagship product, ‘The DTDOT ®’.

For many years now I have been a passionate designer who has kept sketchbook close to hand at all times.  I take my sketchbook everywhere with me and it would be fair to say that if I didn’t do a sketch-a-day, I would become a bit twitchy!

My sketchbook contains many design ideas and proposals to help solve every day problems that either spring to mind during the day, or come from something I observe whilst sitting ‘people watching’ with a coffee in a café.

I often show my sketchbook to classes I teach for two main reasons.  Firstly, so they are not too precious about always presenting ideas in a perfect format.  I encourage pupils to try and believe that good design starts from an initial idea, not a polished drawing!  Secondly, I show my sketchbooks so that pupils can see that I design everyday whilst just going about my usual routines.  The DTDOT ® was designed initially whilst trying to help a pupil draw simple isometric shapes to use as crates for some 3D design work.

At the end of the summer term I chose not to go on the usual school theme park trip.  Instead, I was allocated the task of supervising some pupils for the day that were not able to attend the trips either.  One of the pupils was quite happy to spend the day trying to learn how to draw isometric designs, as this was something that has frustrated him in lesson because he found it so hard.  I’m sure that many of you reading this article will have seen the type of drawings pupils produce if they find isometric drawing hard.  Quite often, an isometric top with a horizontal base.

Picture 1.jpg

I started to produce a sheet with some dots on for the pupil to join together, I produced some dots that when joined up would lead to a series of crates being produced of different sizes.  My initial thought was to leave it there are use this sheet in lessons when pupils needed the extra support.  Whilst I was talking to the pupil, he said that he wouldn’t want a ‘special sheet’ in class, and pushed me on to try and design a drawing stencil that would be suitable for the full range of ability.

I initially made two stencils from card to try out with the pupil on a laser cutter.  One was a complete matrix of isometric dots and the other was a matrix that focussed on a simple isometric cube that I thought could be used to draw cubes side by side to make crates of varying size.

Whilst the matrix of dots confused the pupil in the same way the underlay did, the simple isometric cube was a BIG hit and was considered a bit of a design breakthrough! The pupil loved the new stencil and drew cube after cube….after cube!  There was still an issue with using the new stencil to draw crates of different sizes due to the mind’s eye not being able to picture where the next set of dots would be.

Like many a great solution, it came to me after lunch.  I decided to extend one face of the cube AND number the dots so that I could adopt a ‘dot-to-dot method of explaining which dots to use.  Within minutes, I could write a series of numbers down in a line that we both understood to be an isometric shape….it was for the pupil, a secret code to isometric success!

At this point I was buzzing with excitement!  I had included a pupil in the design iteration of a real product that I know there is a need for. The pupil that really struggled with isometric drawing help me bridge the gap between being a teacher to designer and company owner.  There is no doubt that the iterative design methodology was used to create DTDOT ®.  I got to spend a day thinking and designing, testing with a client, observing my prototype and tweaking the design until I had a basic working concept.

The rest of DTDOT ® came about from having a working knowledge of what pupils want when then design.  Arrows, ellipses, a ruler and some of the other shapes came about from another series of iteration that continued for some time later.  The corners are cut to radii of 5, 10, 15 and 20mm so that pupils can add borders to pages or background boxes to designs.

The sun and sunglasses are to be used so that the pupil knows where the light is coming from to help render the design using three tones.  The rendered cube at the bottom of the DTDOT ® shows how this is done.  The ellipse shapes are placed in such a way that you can’t actually place them on a drawing a wrong way round due to the fact they are placed in the corner of an isometric cube in context.

The feature my pupils use the most though is the curvy arrow at the bottom, they use this twice, back-to-back to give a recycled type symbol.  I encourage all my pupils to write at least one annotation point about sustainability issues or the environment, because the funky arrow is there, they all just do it!

Things moved quickly with the DTDOT ® so that the design had some protection.  I already had a working website, www.dtresources.co.uk and had registered the web domain name as a limited company ‘DT Resources Limited’.  As the DTDOT ® was to be the flagship product of my company, and knowing that The DTDOT ® would feature on social media at some point, I had to protect the design right of my product with the government Intellectual Property Office (IPO), this involves sending design work to the IPO so they can search to see if the design you are submitting can indeed be protected.  I was delighted and very proud that on 28th August 2015 ‘The DTDOT ®’ became a UK Registered Design.

Since release The DTDOT ® it has been selling well and is now used in many schools, mostly in the UK, but some have even been shipped out to Australia! On Twitter #DTDOT is used to show what teachers and students are using the stencil for.  I just hope, that like the pupil I spent the day designing with, all pupils can design in isometric if they couldn’t before!

I have new products ‘in the pipe line’ and hope to continue to develop and make Design and Technology resources whilst maintaining my current role as a teacher and Head of Department.

I would like to thank @kpearsondesigns for producing the DTDOT resources poster – fantastic work!

DTDOT and Marker

Iterative Design Course 30th November 2015 Bolton

This blog post is related to a course that I am running on Monday 30th November at St James’s C of E High School in Bolton.

Sketching and Development with 3D Printing

rendering

This course is suited for teachers of GCSE Product Design and Resistant Materials.

The action packed day will be broken down into four sections:

  1. Idea Generation using a new and fantastic drawing aid, ‘The DTDOT’, marker rendering and a whole host of presentation techniques.

DTDOT and Marker

2. Model making that is useful for product development.

2015-06-22 12.11.09 2015-06-19 10.31.15

2015-06-22 12.11.58 GCSE 3D Printing

Blue Foam Models

Blue Foam Models

3. ‘CAD made easy’ using Autodesk Inventor to produce ideas that could are suitable for 3D Printing.

4. 3D Printer setup (using four different printers), class and project management when using 3D printers and the advantages of the many different printers that are available.

During the day many practical hints and tips will be shared regarding project management and advice on how to make the whole ‘design and make process’ fun and stress free! (For you and the pupils).

Included with the course:

  • A selection of worksheets that you can copy to use with your own pupils.
  • The resources you use for sketching and rendering are yours to take (DTDOT Drawing tool, layout paper pad, selection of rendering markers, 0.5mm blue mechanical pencil, thick and thin lining pens)
  • Lunch and refreshments

The course will be delivered by John Donnelly, of DT Resources Limited and will be held at St James’s C of E High School in Bolton (BL49RU) on Monday 30th November 2015.

10am – 4pm

£180

John Donnelly is an outstanding teacher and director of DT Resources Limited.

John has been an examiner and Moderator for AQA Product Design and currently leads the Design and Technology Department at St James’s C of E High School.

John is the founder member of the most popular Design and Technology Teachers Facebook group and manages the DTResources Dropbox.

To book a place on this course please ask for a booking form by emailing: john@dtresources.co.uk

As always, places are limited so book early to avoid disappointment.

DT Resources Limited is not connected with St James’s C of E High School and is a separate registered company.

Company No. 09522880 www.dtresources.co.uk


How to 3D Print in School

The World is NOT flat, it is round.

“When Columbus lived, people thought that the earth was flat. They believed the Atlantic Ocean to be filled with monsters large enough to devour their ships, and with fearful waterfalls over which their frail vessels would plunge to destruction. Columbus had to fight these foolish beliefs in order to get men to sail with him. He felt sure the earth was round.” –Emma Miler Bolenius, American Schoolbook Author, 1919

Whilst this article is not related to Christopher Columbus, or sailing for that matter, the quote above does work as an analogy for my views on how we need to look at the way we teach design and the way we use 3D Printers in school.

Sheets, Planks and Donnelly Boxes

2015-06-22 12.02.42

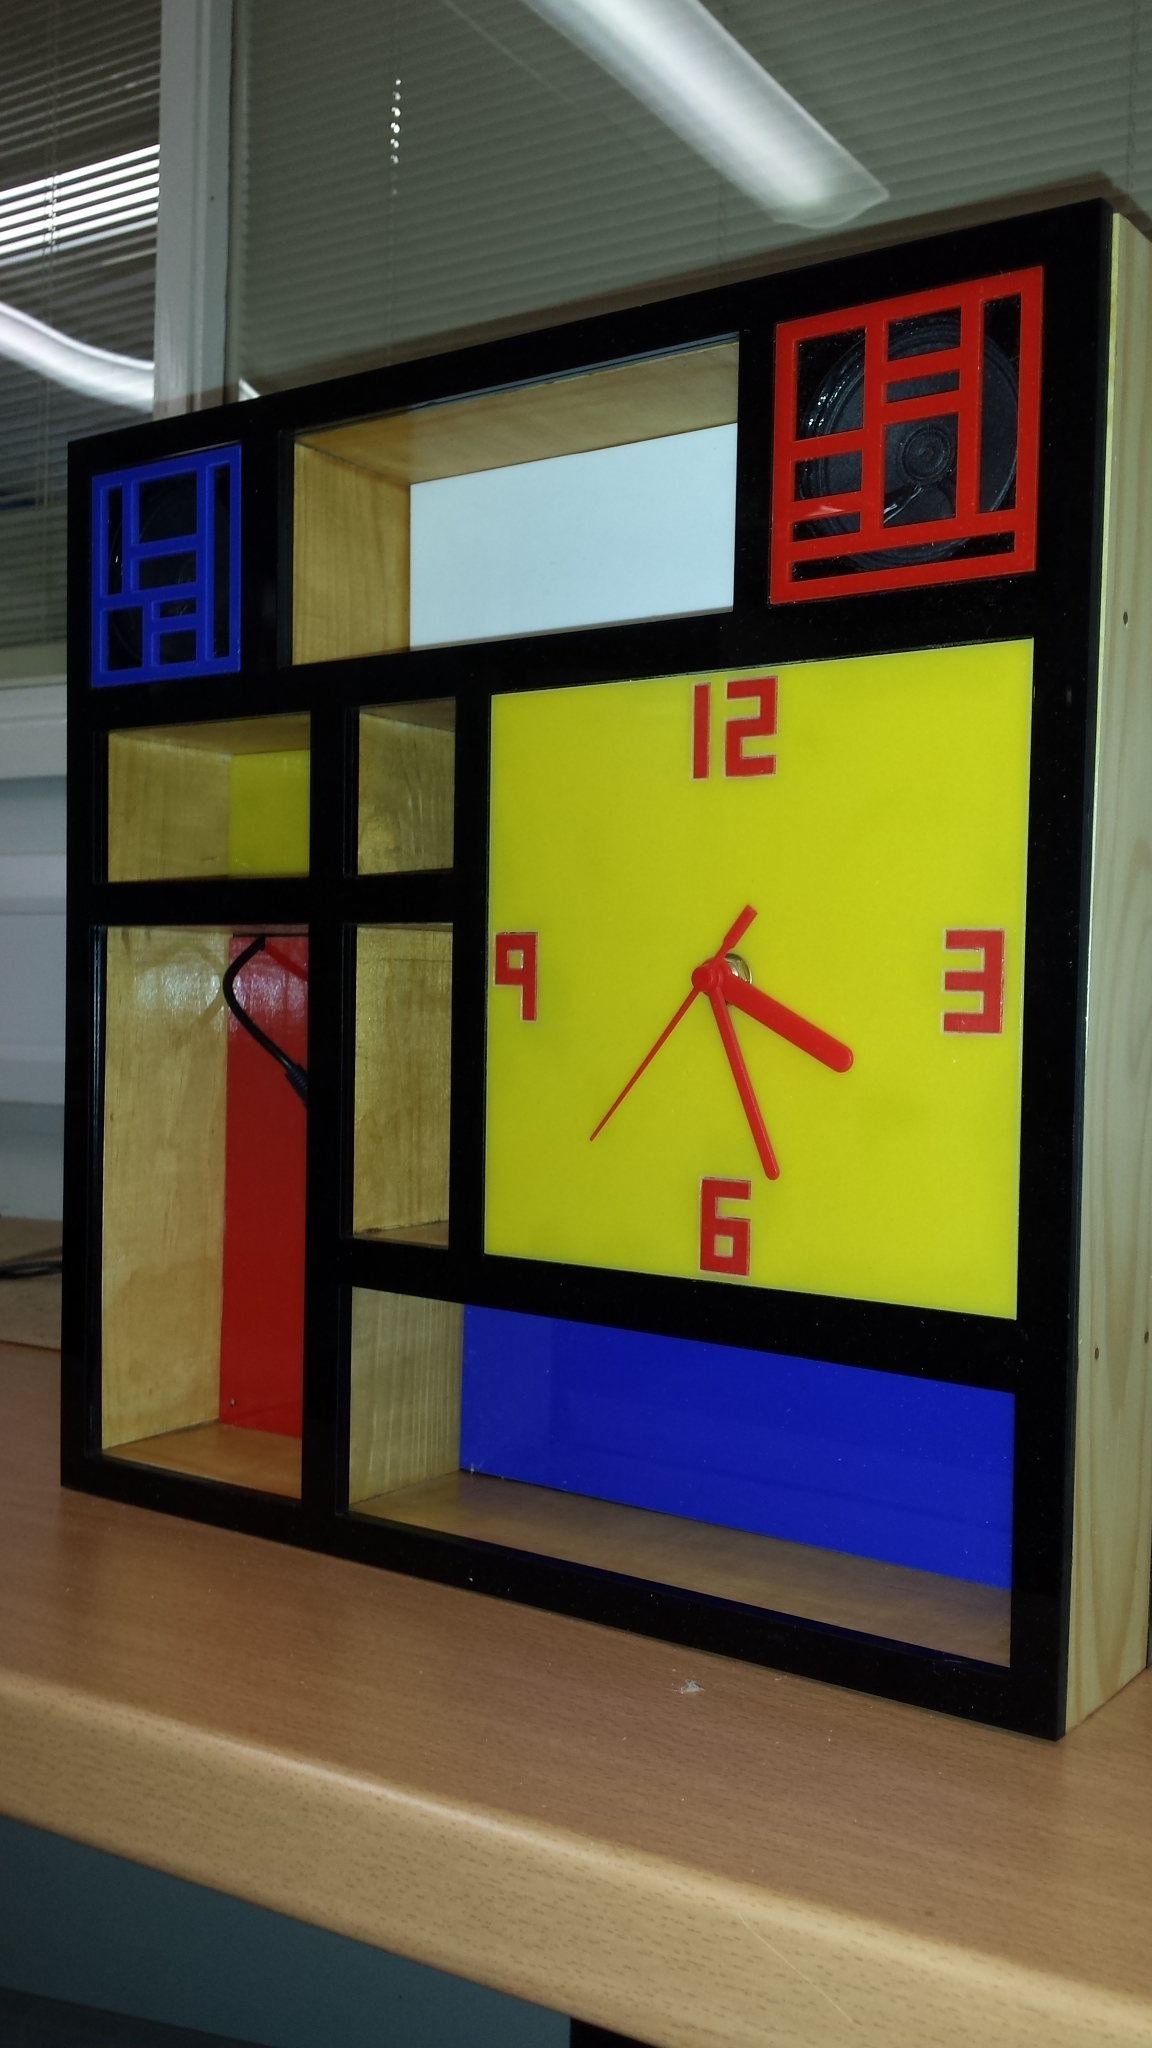
I can only speak of, and criticise my own practice, but since most of the material that we buy in my department comes in sheets and planks, it is no wonder that lots of the pupils end up making something that resembles a box.  Don’t get me wrong, many pupils have made mighty fine boxes…..they have produced Memphis Clocks, Art Deco MP3 docking stations, De Stijl lamps and desk tidies. I have been very proud of them all at the time, but they have been boxes at heart.

If ever a pupil wanted to make something that looked more organic (heaven forbid), we have done so, but we have wasted quite a lot of material by layering up, sanding away and discarding sometimes as much material as we end up with!

Things got so bad with boxes one year, pupils in one of my classes used to go and ask my technician if they could have a ‘Donnelly box’ (the name was given by the pupils, not me).  They were then given four lengths of pine that they could join together to hold a circuit and battery.  Once they had the ‘Donnelly Box’ and circuit securely fixed in place, they could then start to think about how to disguise the box so it looked like their own.  Normally acrylic was cut and added to make a phone holder or clock, the corners of boxes were sanded, MDF was added, then primed and painted….the ‘Donnelly boxes’ looked great in the end, but they were still box shaped monstrosities that were far too big for their intended use.

Be more like Christopher Columbus (A picture of Christopher Columbus?? I am not sure about photo copywrite?)

With this in mind, I feel that I have had to become a little bit more like Christopher Columbus and am trying to challenge pupils to move away from ‘flat’ (and monsters) and think round/curved/organic.

I sometimes blame the way pupils are taught to design in the first place for the box shaped designs and products I see.  When we encourage pupils to draw something that resembles a 3 dimensional sketch they find it hard.

The process of teaching 3 dimensional sketching often starts with the use of isometric paper or a 3D drawing aid to draw a box or crate. Once the pupils have their box drawn they are then asked to use the box as a guide so that their 3D design can fit inside, commonly known as ‘crating’.  I have seen pupils spend so long getting their initial box projected correctly, I can’t help thinking that it is no wonder they are happy to actually build a box since the one they have just drawn looks so neat!

I am very glad to say that the ‘Donnelly Boxes’ are well and truly gone.

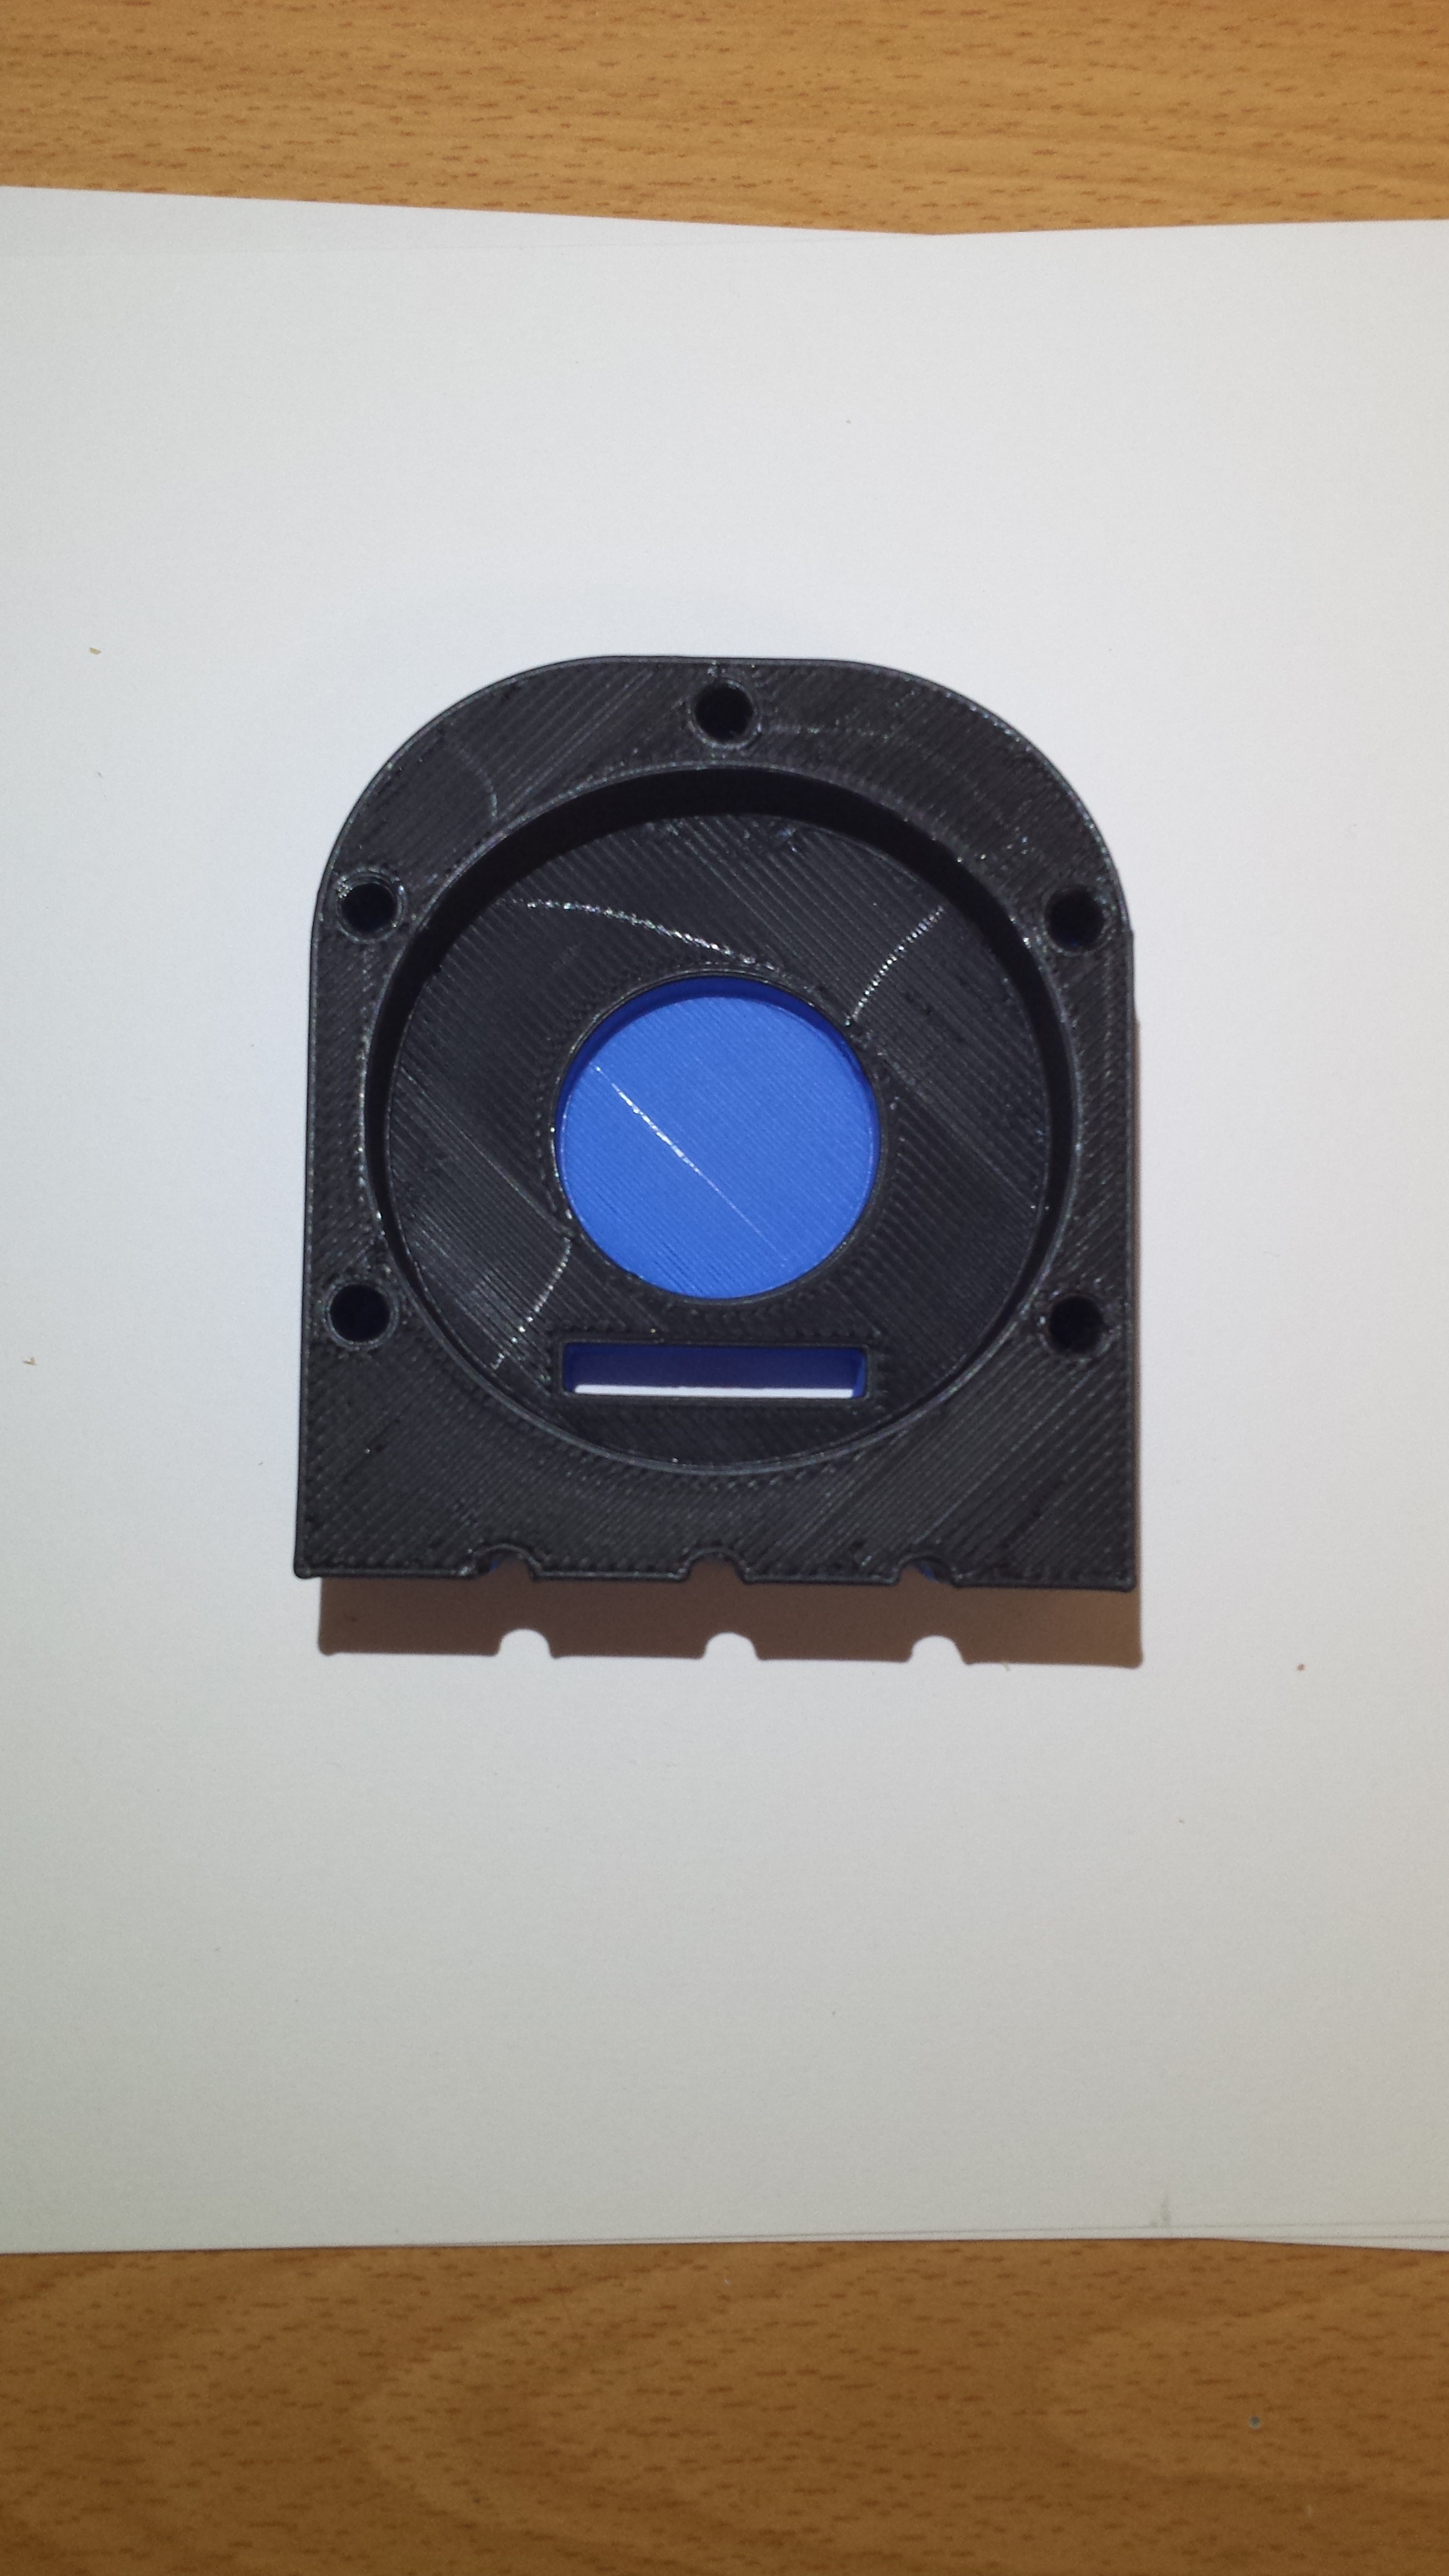
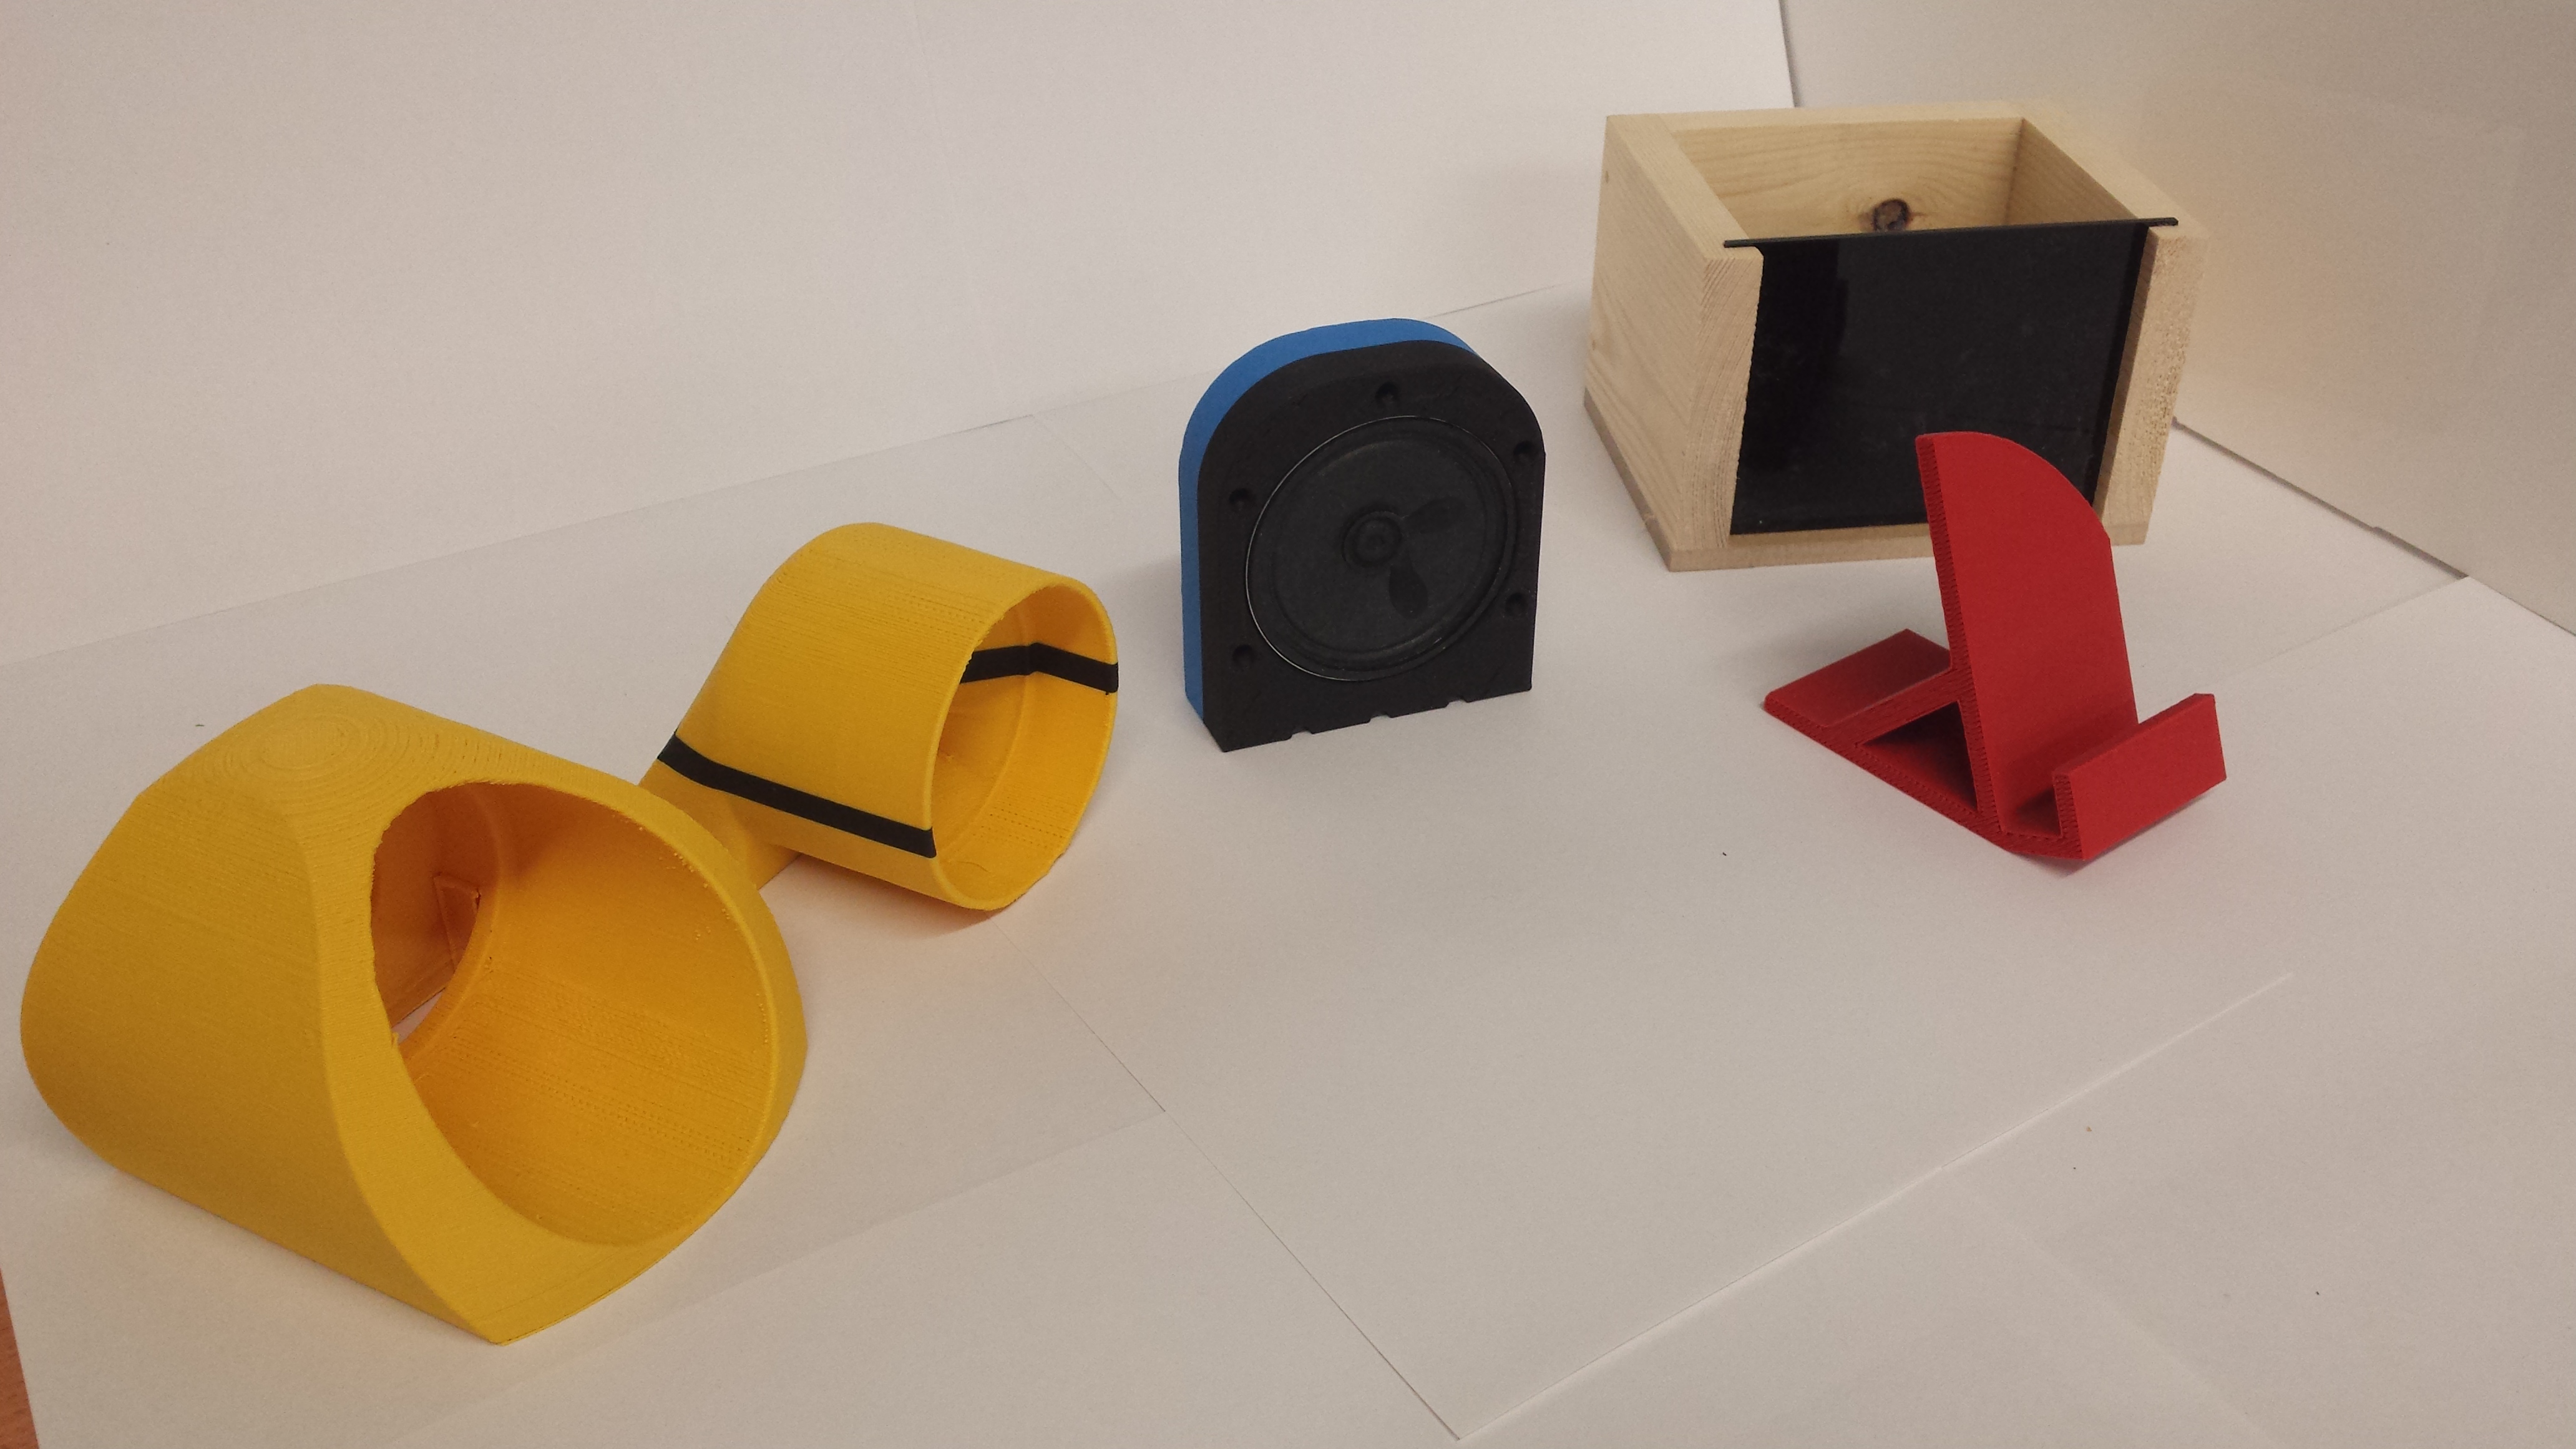
Additive manufacturing in the form of 3D Printing and a new approach to design development has made way for parts to be designed by the pupils for the projects they are making. Simply by making specifically designed parts, e.g. a speaker holder, battery compartment and head phone wrap, the pupils have really had to design and go through a development process with more rigor than in the past where everything was just put inside a box that was oversized.

Projects shapes are now more appealing to the eye and function better because stock size materials have not been the starting point for the design.  The starting point is now a thorough product disassembly of standard components so that the pupils’ projects function around the parts of a product that cannot be changed.

Blue Foam and Traditional hand Tools 

2015-06-11 11.17.31  2015-06-11 11.32.32  2015-06-11 11.18.06

Using the context of a docking station.

Many pupils in the past have soldered together their pre bought Amp Kits, put the PCB in ‘the box’ and then glued the speakers to the back of a laser cut piece of acrylic so that a speaker grill was produced.

There is a real lack of design with this approach because the speakers were just smeared with epoxy resin and fixed to the acrylic with no real design taking place with regard to fixing the speaker properly or designing something around the speaker itself.

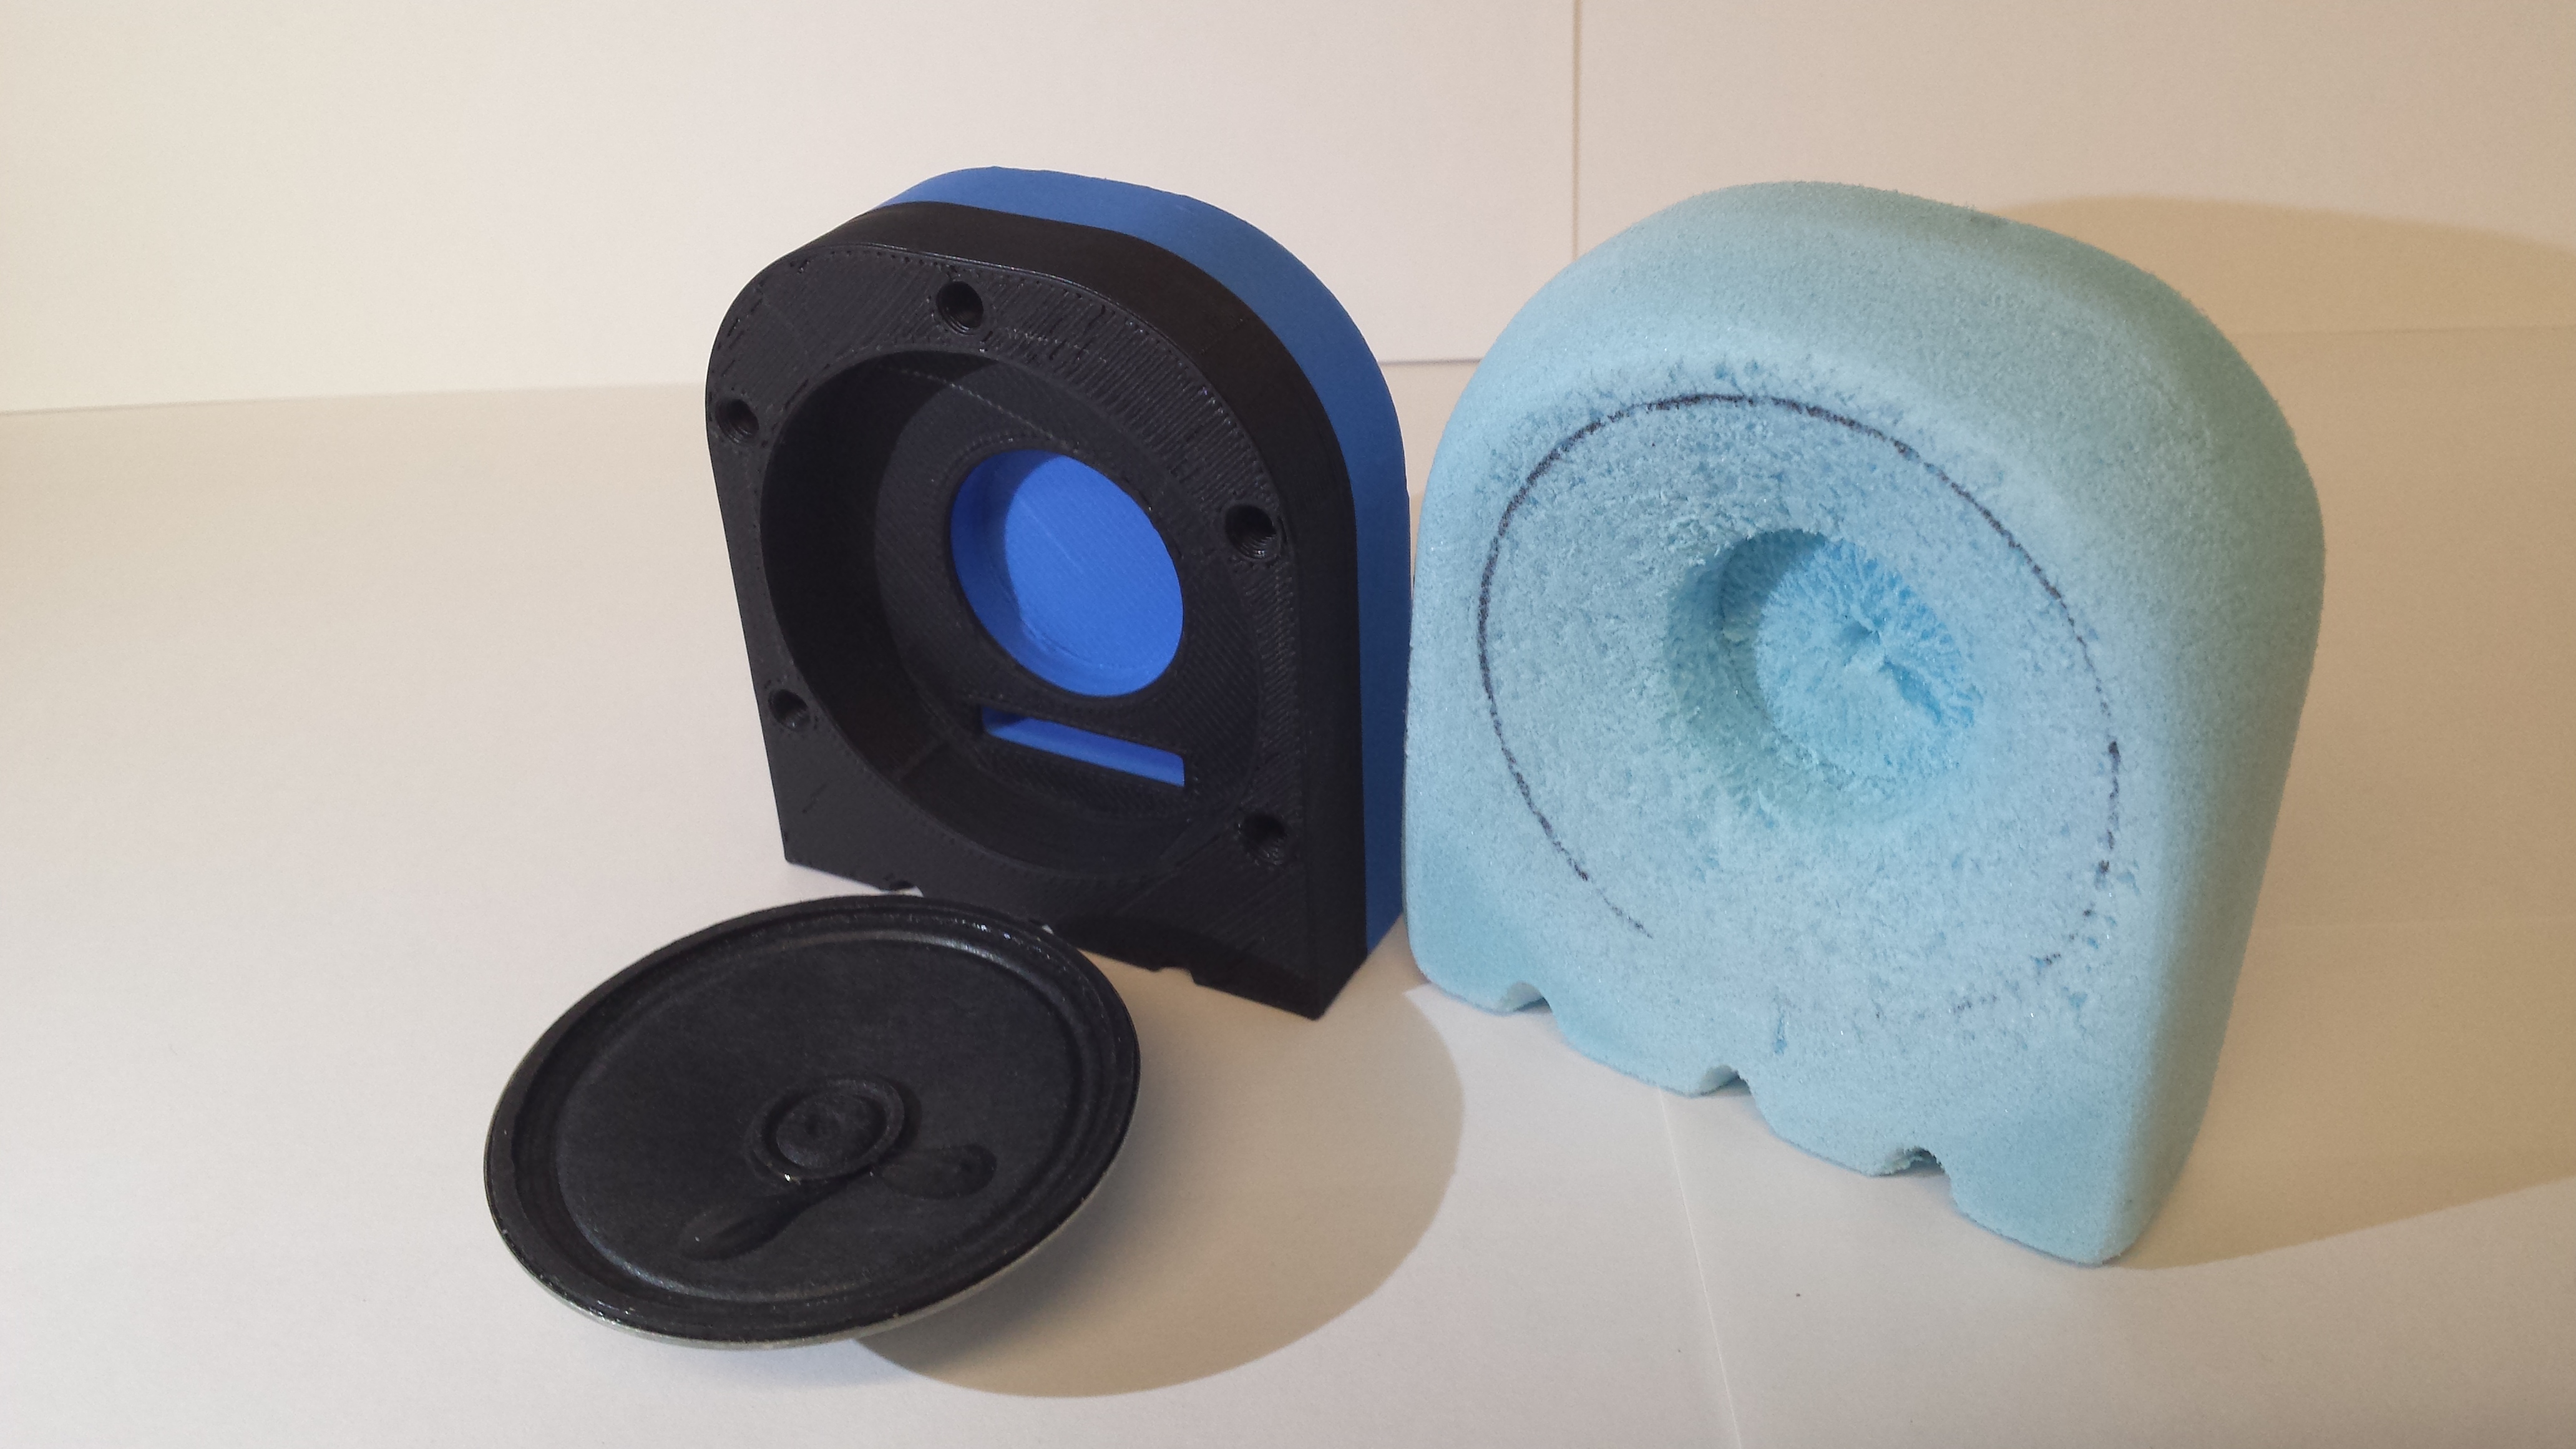
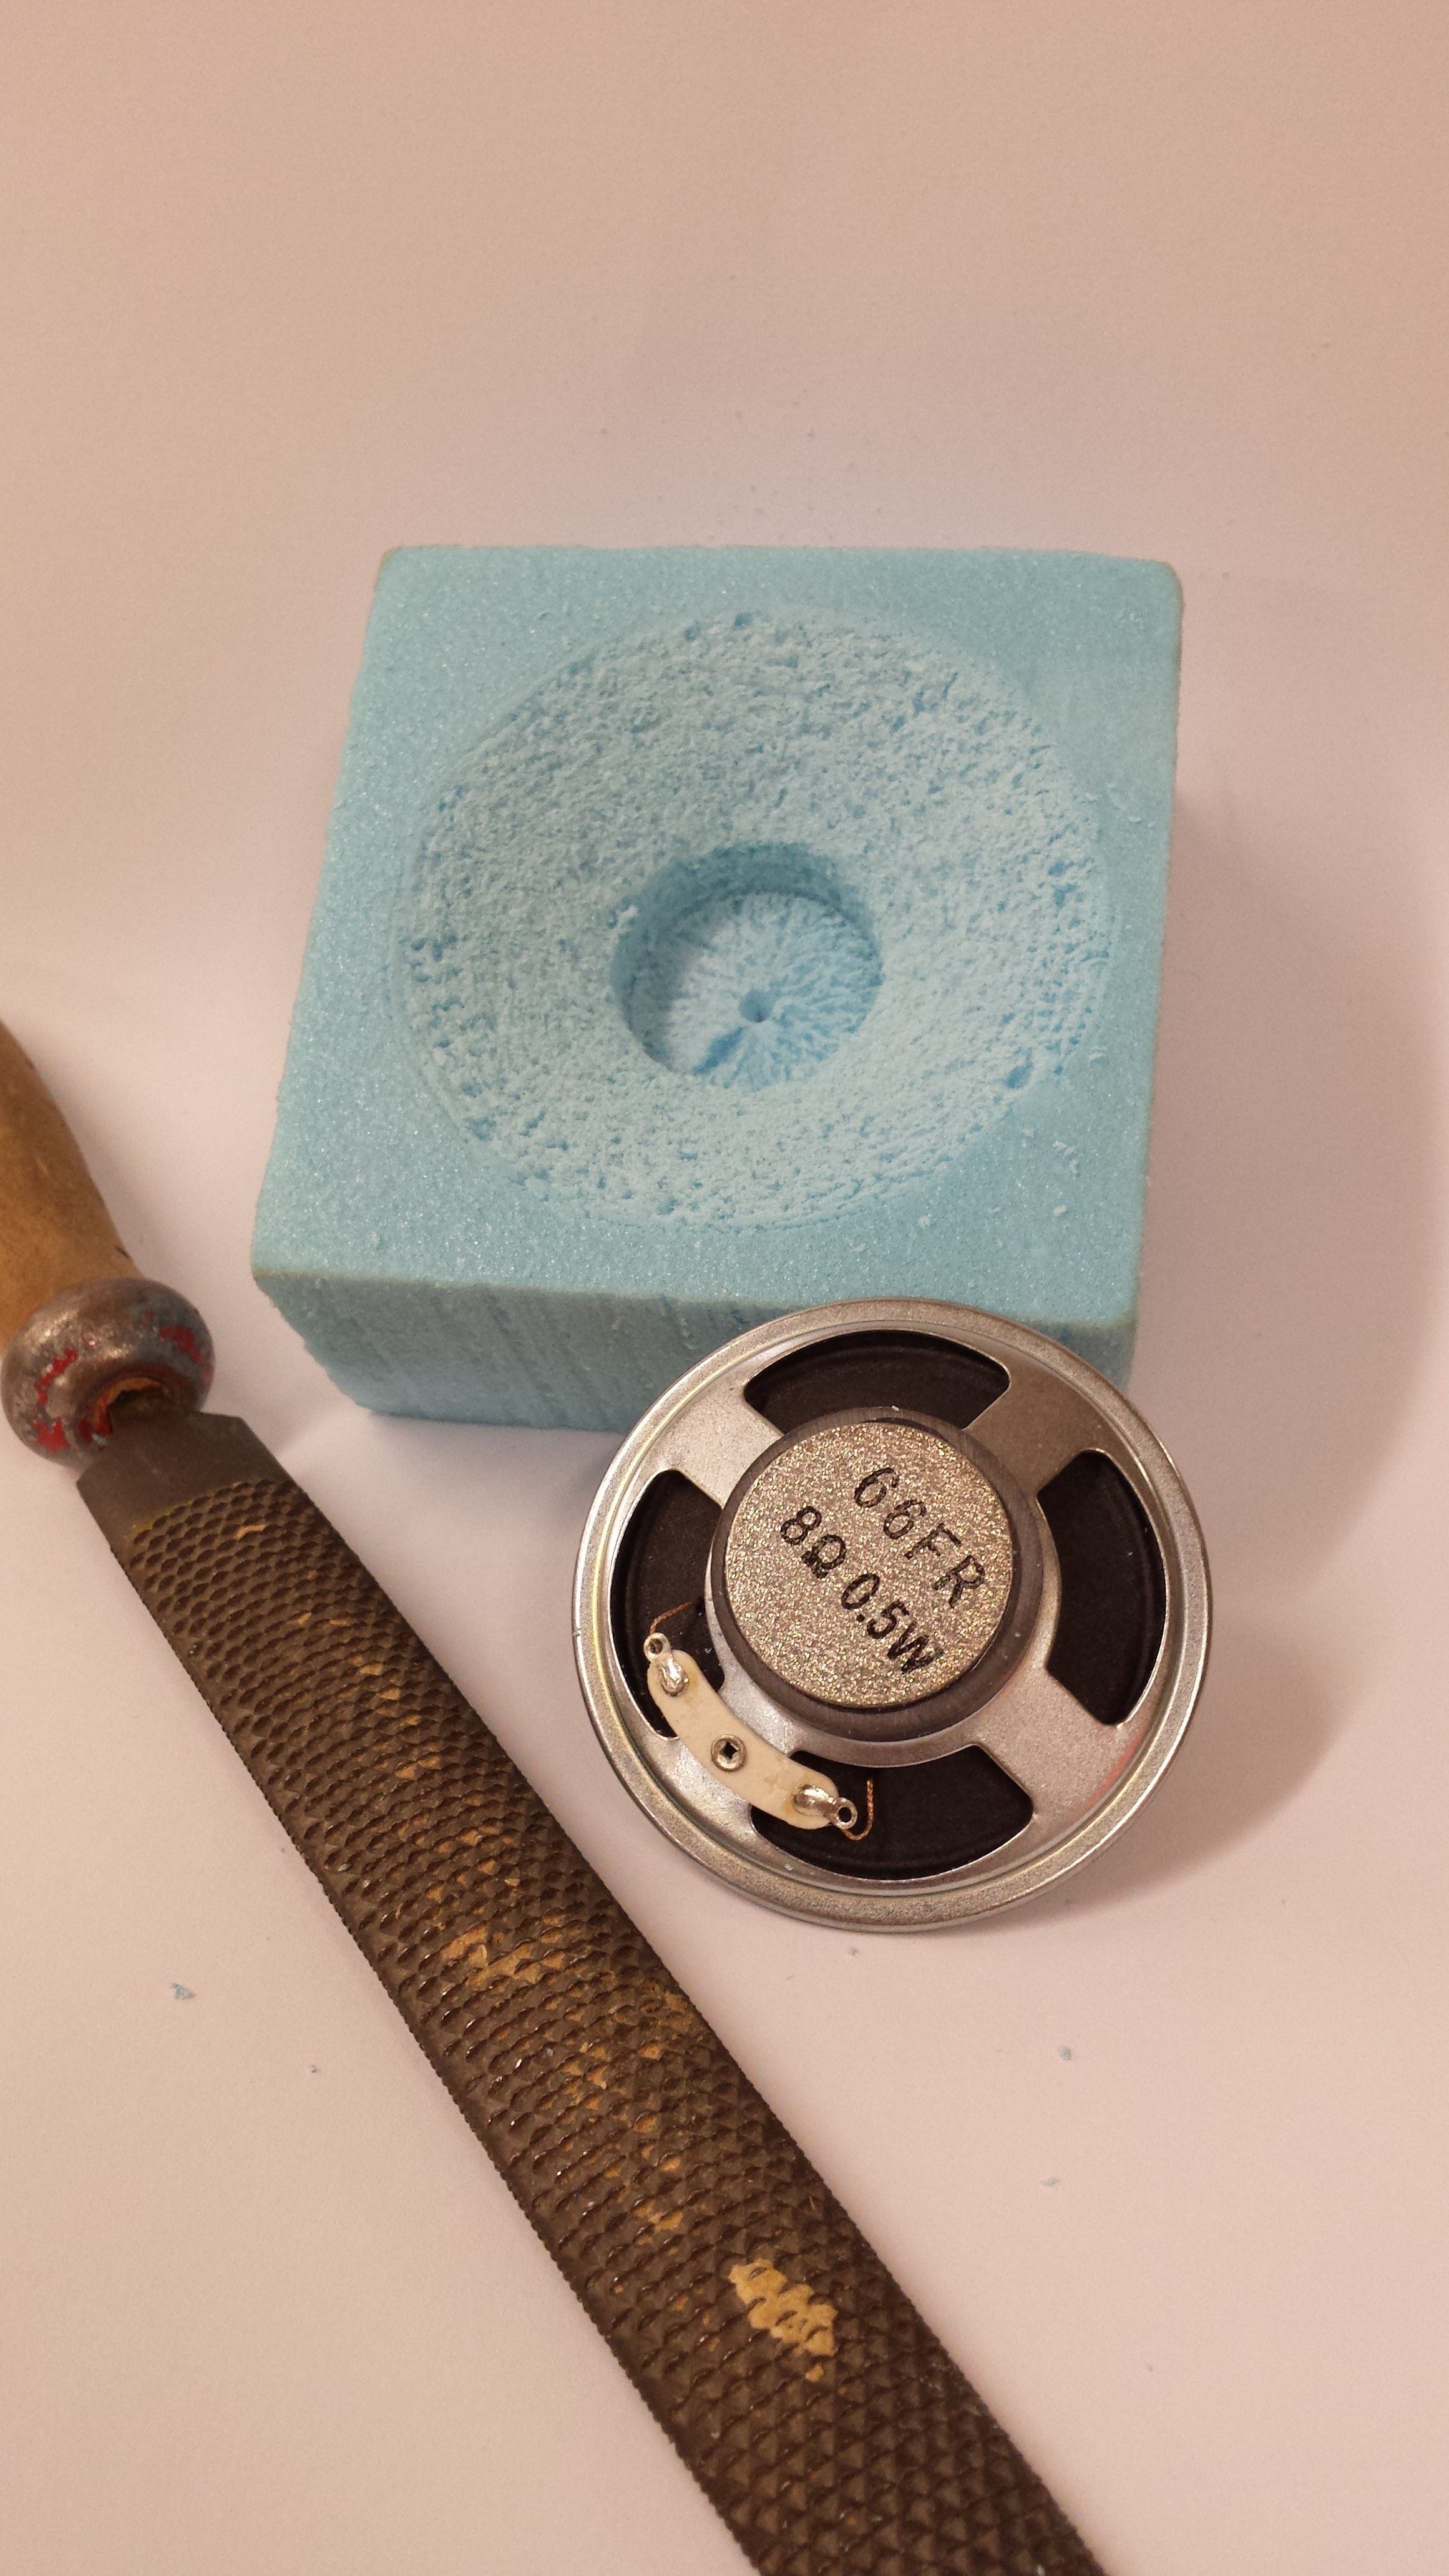
My simple strategy now is to give the pupils a speaker, a chunk of blue foam and access to a selection of traditional hand tools.  The pupils must make a shape that fits the speaker perfectly first, and then focus on shaping more of the foam so that the speaker holder has aesthetic appeal.  (Photo of a speaker inside blue foam)

Method:

  1. The pupil drills a hole in a piece of foam with a forstner bit that is large enough to take the magnet of the speaker.
  2. Then the foam is cut through the centre of the hole to give two symmetrical parts.
  3. More foam is removed so the speaker can fit in either piece of foam.
  4. The two halves are glued back together do the rest of the shaping can take place.

When sticking blue foam together we use ‘Gorilla Glue’.  One half of the foam has the Gorilla Glue on, the other is wet with a damp paper towel.  The two halves are held together with masking tape until the glue has set.

Once the speaker is in the foam, and the rest of the foam has been shaped sufficiently, the model is then carefully drawn on a 3D CAD Package (we use Autodesk Inventor) so that a 3D prototype can be printed.

 2015-06-19 10.31.15  2015-06-22 12.11.09  

Final Assembly

Once specific parts have been 3D printed and developed you will be in a position where you will have an attractive holder/stand for your speaker, a battery compartment, head phone wrap and even a phone holder.  The temptation here might still be to make a box to put these things on to so the PCB can be hidden within the box.

2015-06-22 12.11.48  2015-06-22 12.11.09

To get around this issue I have had some great products made where pupils have simply layered up some laser cut 5mm acrylic with compartments made by removing sections to hold a PCB and battery.  This can be done by using just four layers of acrylic so that the final product remains compact.  To develop the product further I have added a simple PIC circuit in the acrylic case so that a pattern of flashing LEDs can be seen as the MP3 docking station is working.

2015-06-22 13.44.51   2015-06-22 13.49.49

Misuse of 3 Printing

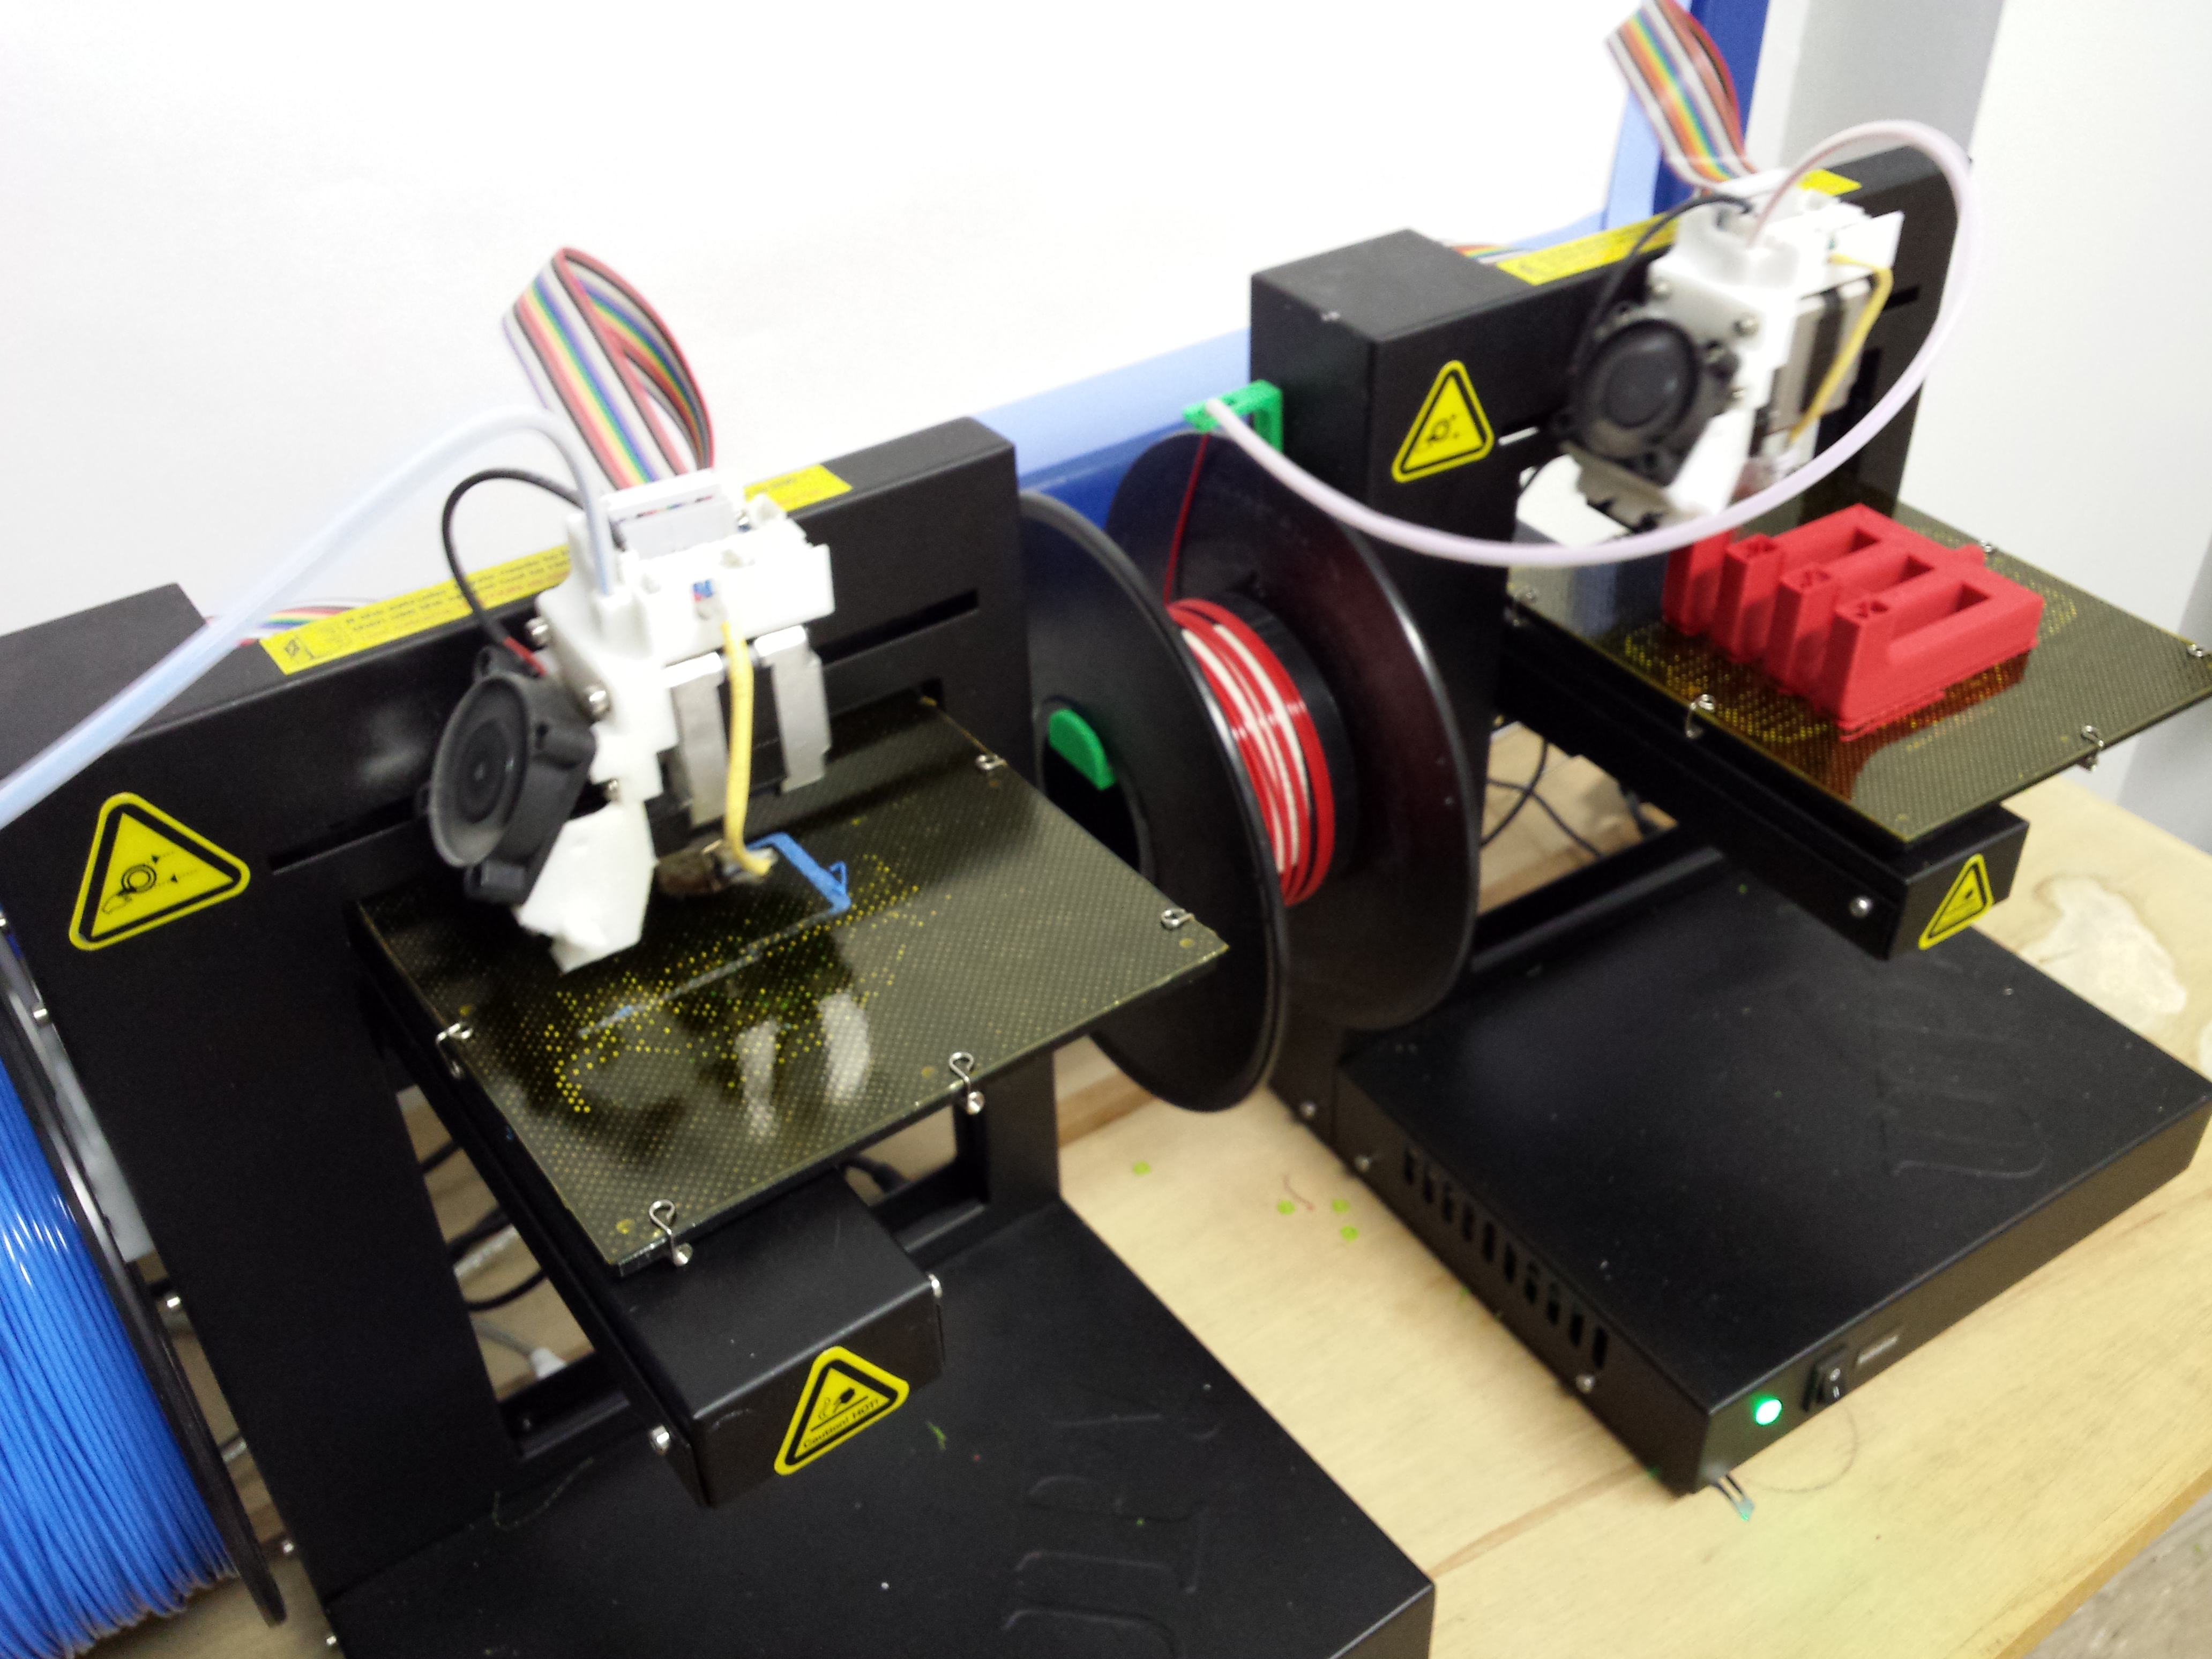
When people first get a 3d printer there is a temptation to print anything and everything you can.  Mostly commonly I see iPhone cases or Eiffel Towers from an STL download site used in the first instance.

The real fun and excitement though comes from printing your own 3d parts that you have designed for a purpose; this is where the real learning will take place for the pupils too.  Many teachers I speak to worry about the time it takes for a product to get printed. I can see their point as some large parts may take 4-5 hours to print.  Whilst this seems slow going at first, once the initial excitement for printing Eiffel Towers has died down, you will be surprised how straight forward it is to get classes to have 3d printed parts.

Within a Year 11 class it is unlikely that every pupil will be ready at the same time to print a part out, this already paces the process for you.

Then within a class there are the ‘super keen’ that will come and see you in the morning before school or at the end of the day to ask if they can print out their STL file.  Since you can leave the printer running during the day or overnight it is as if GCSE work is being produced without the mess and chaos that can take place when a whole class are manufacturing in a workshop.  I was surprised myself at how easy it was to get through heavy use of a 3d printer with Year 11 this year.  Most prints were added in the morning and end of school, with very few being set up in lesson time. This has worked with the three classes, 60 Year 11 Product Design students all printing roughly three parts each.

Once you are used to using 3d printing in projects it can be easy to over use the printer and neglect the traditional skills that encouraged us all to start teaching Design and Technology in the first place.  I think 3d printing is exciting and leads to amazing looking and functional projects, but I do believe it should be used when needed rather than needed to be used because it is there.  My advice would be to start by printing a part for a project, rather than printing a project.


www.dtresources.co.uk

As many of you will know I manage the Facebook Group ‘Design and Technology Teachers’ and the ‘DTResources Dropbox’.  I spend hours per week managing both of these resources and look at 100s of examples of classroom resources that teachers either sell or share via social media.

I feel that I have a good idea of what useful resources teachers would like if they had the time to make them and I am aware of some of the current issues that some departments face e.g. not having a full time technician or non-specialists teaching Design and Technology.

Since having a baby seven months ago, I find myself going to bed very early, and then getting up VERY early the day after.  These early starts have provided me with many hours of time to spend producing resources that I will use with my own classes, and will then give away or sell on the dtresources website.

I have always liked the idea of giving resources away, and will continue to do so if the resources can be downloaded as a PDF or JPEG for example.  The resources that will be sold have to have a price attached to them to cover the purchasing of materials, business running costs, website hosting and a small fee for my time in making, packaging and posting resources out to teachers….all of which is very time consuming.

It is my aim for the company to grow so that complete curriculum coverage can be planned for by using the resources from my website.

The other resources that will be available from http://www.dtresources.co.uk will help improve whole class teaching on topics such as drawing/sketching and annotation of ideas.  The class stencils that I have made came about from pupils in my class using a popular 3D drawing tool, but then wanted a stencil to help with 2D designing and annotation.  So far these stencils have really helped improve the quality of the work from the pupils in my class.  Click here to see the stencils.

Because I teach mostly AQA GCSE Product Design, the resources will be suited to delivering Product Design, Resistant Materials and KS3 Design and Technology. On the GCSE Product Design Exam paper, there is always a high mark question about manufacturing in quantity.  I have produced a class pack for teaching batch production/production lines and use clocks or photo frames as the product.  The outcomes have been outstanding.  Click here to see the products.

The next phase of the company will be to provide whole class kits to cover every part of the curriculum in an exciting and engaging way.

Getting started with 3D Printing in the classroom.

‘Keep the old, but in with the new’ – that is pretty much what it is like being a Design & Technology Teacher, and it is pretty much how I like it 🙂

Background

I am 35 years old, I am in my 14th year as a DT Teacher and my 11th year as Head of Department.  Whilst planning how to start this blog post I had a think back to what I loved about DT when I first walked into a workshop as a Year 7 pupil in 1991.  Mostly it was the smell of timber and coolant from either the lathe or milling machine, the selection of tools neatly in the racks, just waiting to shape my piece of raw material into something, that at the time I thought was magical…most probably a pencil holder.

I think I have had a selection of some truly amazing teachers that inspired me to become a DT Teacher myself.  I always though that if I enjoyed coming to DT lessons as much as I did, then what a truly amazing job being a DT Teacher would be!  I feel that during my secondary school and college years I was taught DT in a very traditional way.  I think I gained a solid understanding about shaping/joining timber, plastics and metals using most methods known.

I then went to Sheffield Hallam University to continue building on my current knowledge, but developed new skills using PIC technology/electronics and CADCAM.  At the time ProDesktop was just making its way into schools and 3D printers had not even been thought of.

I would say that I have had to learn as many new skills since starting as a teacher as I knew to begin within 2001.  Whilst some skills I have been taught over the years are not used much at my school, such as welding/aluminium sand casting, I still think it is important to know these skills as it is more the lacking of facilities/curriculum time that prevent me teaching this to pupils rather than a desire to keep the knowledge from them.

Sheets + Planks (can) = Boxes

I can only speak of and criticise my own practice, but since most of the material that we buy in my department comes in sheets and planks, it is no wonder that lots of the pupils end up making something that resembles a box.  Don’t get my wrong, they have been mighty fine boxes…they have been Memphis Clocks, Art Deco MP3 docking stations, De Stijl lamps and desk tidies, whilst I’ve been very proud of them, they have been boxes at heart.  If ever a pupil wanted to make something that looked more organic (heaven forbid), we have done so,  but we have wasted quite a lot of material by layering up, sanding away and discarding sometimes as much material as we end up with!

I am sure that because I encourage my pupils to sketch in an isometric style using the method of crating as a starting point….they already have a box drawn on the page…they then have the design problem of sketching something for their MP3 player PCB/Battery to go in….why re-invent the wheel, when you have just drawn a perfectly good box?  As far as I am concerned, I need to change my mind-set and teaching strategy to overcome the production of boxes and plan how to teach the pupils to consider 3D printing as the method of manufacture!

A New Mind-set GCSE 3D Printing

Since this blog post is about getting started with 3D Printing, you should be able to see part of an MP3 Prototype that a pupil I teach has made.  They started off by designing with blue foam rather than sketching.  The pupil who made this model drew round his battery, PCB and speaker on the blue foam, then set to work shaping it with a coping saw and sander.  The shape he has ended up with is far removed from a traditional box.  In the past when pupils have made an MP3 docking station they have made an attractive pine box, used dowel to join the corners, turned aluminium feet to hold it off the table top, they have laser cut some acrylic sheet to cover the front, and cut out a decorative pattern from the acrylic so that when the speaker has been glued behind, you can hear the sound from the box.

GCSE Product Design

The photo of this GCSE project scored a moderated 32 marks for the practical aspect of the course.  It is made up from boxes within a box :-).  Its function is an MP3 Player, Clock and Storage unit. It measures 600x600mm and is 80mm deep, huge for the function really, but well made and finished, very typical of the project type that many of my pupils have made.

This year though, we have 3D printers!  The projects the pupils are making are looking far more professional and more like the size of the mass produced type found on sale.  At my school we use Autodesk Inventor as our main 3D CAD software.  The pupils all know that if they can draw it, they can make it, so I guess that in getting started with 3D Printing, you need to have got started with 3D CAD first. (You can download lots of free STL files to print, but the pupils will learn far more if they draw, and print their own work.)

How to Design for 3D Printing

There is nothing wrong with sketching and then drawing from a sketch to a CAD package.  From past experience though, if I have ever sat with a pupil and helped them draw something on Autodesk, that has started off as a sketch, I have always found that even the most able of pupils have missed off some dimension that leaves you guessing how big part of a drawing is going to be.  To fix this, I get all pupils to start with a 3D sketch, then make a full sized 3D blue foam/card model of the final sketch.  Once the pupil is happy with the final model I get them to sit at a PC with Autodesk loaded up, a ruler and some digital callipers.

I either get them to start with a profile drawing that can be extruded (depending on what they have designed), or they will start by drawing a block that was the same size as the original piece of blue foam.  It is then just a matter of careful measuring to remove the parts of ‘foam’ that you no longer need.  As long as a pupil can draw using a revolve and do simple extrusions to add/cut material they can pretty much draw most things they want to make.

What to print

When we got our first 3D Printer, it was an Up 2 Plus.  The first thing I did was download an STL file from a sharing site for a pencil pot.  Twelve hours later the print was done!  Since then I have learnt more about the software settings and could print the pencil pot in about 4 hours :-).  The main concern I had was how to get the pupils excited about designing for 3D printing, if I knew that I could never do 4 hour prints for each of them….then I had a brain wave!  I thought let’s get them to make a key ring!  I assume that most DT teacher have either made an acrylic Key ring themselves, or have taught pupils to cut/shape/polish acrylic key rings in their own workshop at some point?  After I had designed my key ring and printed it in just 8 minutes I thought that I was onto a winner!Up Plus 2

After a practice at making some key rings for most people I knew, I had time to reflect on what a poor idea this actually was.  In a way, I was still stuck in my old mind set of 3D printing something that I would normally be made from acrylic sheet (not that I make key rings anymore).

Whilst I think that 3D printing is amazing, I think that the real learning takes place with the designing, either on paper or screen.  The pupil actually learns very little seeing their design being made.  It is the thrill of getting your design printed that is the reward for designing something brilliant!

Now I encourage pupils to design with plasticine and blue foam, to look at images from nature and biomimicry design in a hope they will produce something a little more Zaha Hadid than Rubik’s Cube.

I am sure that my current Year 10 Product Design class will make their fair share of pine boxes for their desk tidy/MP3 player/lamps, but I hope to encourage them to ‘think outside the box’ (haha), and design maybe an exciting phone holder/headphone wrap or draw handle that could not be made in any other way other than to 3D print it!